Picture this: steam rising from a cast-iron pan, the air thick with cardamom and lemongrass, and beef so tender it practically melts before your fork can reach it. That’s the magic moment when I first discovered what would become my signature Coconut Red Curry Drip Beef recipe.
My neighbor’s Thai grandmother had been watching me struggle with yet another dry, flavorless attempt at curry through our kitchen window. She knocked on my door with a jar of homemade curry paste that looked like liquid fire and smelled like heaven. “You cook beef wrong,” she said with a knowing smile. “I teach you right way.”
That afternoon changed everything I thought I knew about curry. The Coconut Red Curry Drip Beef she taught me wasn’t just a recipe, it was a masterclass in balancing sweet coconut cream with fiery chilies, tender beef with aromatic herbs. The “drip” part? That’s what happens when the coconut milk reduces down to this glossy, flavor-packed sauce that literally drips off each piece of beef like edible silk.
This isn’t your typical weeknight curry that you dump from a jar. We’re talking about a dish that makes your whole house smell like a Bangkok street market and has people asking for the recipe before they’ve even finished their first bite. The technique combines traditional Thai curry methods with a few Western twists that make it foolproof for home cooks.
What Makes This Coconut Red Curry Drip Beef Special
Three things set this Coconut Red Curry Drip Beef apart from every other curry you’ve tried. First, we brown the beef in batches, none of that crowded-pan nonsense that steams your meat instead of searing it. Second, we make our own curry paste because store-bought versions can’t touch the fresh, vibrant flavors we’re after. Third, we add the coconut milk in stages, creating layers of richness that build on each other.
The “drip” effect comes from reducing the coconut milk until it’s thick enough to coat the beef but still flows beautifully when you lift it with a spoon. It’s that perfect consistency where the sauce clings to every piece of meat without being gluey or thin.
Perfect Coconut Red Curry Drip Beef Ingredients
For the Curry Paste:
- 8 dried red chilies, stems removed and deseeded
- 4 shallots, roughly chopped
- 6 garlic cloves, peeled
- 2-inch piece of fresh ginger, peeled and sliced
- 2 stalks lemongrass, tender parts only, chopped
- 1 tablespoon coriander seeds, toasted
- 1 teaspoon cumin seeds, toasted
- 3 kaffir lime leaves, stems removed
- 1 tablespoon shrimp paste (or 2 tablespoons soy sauce for vegetarian)
- Zest of 1 lime
For the Beef:
- 2 pounds beef chuck roast, cut into 2-inch cubes
- 2 cans (14 oz each) full-fat coconut milk, separated
- 2 tablespoons palm sugar or brown sugar
- 3 tablespoons fish sauce
- 2 Thai bird’s eye chilies, sliced (optional, for heat)
- 1 red bell pepper, sliced
- 1 cup Thai basil leaves
- 3 tablespoons vegetable oil
- Salt to taste
Here’s where we get smart about swaps. Can’t find shrimp paste? Use anchovies, mash up 3 fillets for the same umami depth. No palm sugar? Brown sugar works perfectly, though coconut sugar tastes even better.
Fresh lemongrass is worth hunting down, but if you’re stuck, use 2 tablespoons of frozen lemongrass paste from the Asian market. Skip the dried stuff, it’s like using cardboard.
The beef choice matters more than you might think. Chuck roast has those perfect marbled lines of fat that break down during cooking, making each bite incredibly tender. Stew meat works too, but avoid lean cuts like sirloin, they’ll turn tough and chewy no matter how carefully you cook them.
How to Make Coconut Red Curry Drip Beef
Step 1: Build Your Paste Foundation
Start by soaking those dried chilies in warm water for 20 minutes. They need to soften up so your food processor doesn’t throw a tantrum trying to break them down.
Toast your coriander and cumin seeds in a dry pan until they smell incredible, about 2 minutes. This step releases oils that would otherwise stay locked away. Let them cool, then grind them in a spice grinder or mortar and pestle.
Now comes the fun part. Drain your chilies and toss everything into a food processor. I mean everything, chilies, shallots, garlic, ginger, lemongrass, ground spices, lime leaves, shrimp paste, and lime zest. Process until you get a smooth, deep red paste. This might take 3-4 minutes, and you’ll need to scrape down the sides a few times.
The paste should look like thick, fragrant mud. If it’s too thick to process, add a tablespoon of water, but no more. You want this concentrated flavor bomb, not a watery mess.
Step 2: The Beef Gets Its Moment
Pat your beef cubes completely dry with paper towels. Wet meat won’t brown properly, and we need that caramelized crust for flavor. Season generously with salt, coat all sides thoroughly.
Heat your oil in a heavy-bottomed pot over medium-high heat. When it shimmers, add half the beef. Don’t move it around! Let each piece develop a golden-brown crust before flipping. This takes patience, about 3-4 minutes per side.
Remove the first batch and brown the remaining beef. This two-batch approach keeps the pan from getting overcrowded, which would steam the meat instead of browning it. Trust me on this one, it’s the difference between good and transcendent.
Step 3: Where Chemistry Meets Cooking
Now we cook that curry paste until it blooms. Add it to the same pot (don’t clean it, those browned bits are liquid gold) and stir constantly for 2-3 minutes. The paste should darken slightly and smell absolutely intoxicating.
Here’s where most people mess up: they dump all the coconut milk in at once. We’re smarter than that. Add just the thick cream from the top of one can, about 1/2 cup. Stir it into the paste and let it sizzle and bubble for 2 minutes. This step fries the paste in coconut fat, releasing flavors that would otherwise stay trapped.
Gradually add the rest of the coconut milk, stirring constantly. The mixture should look smooth and glossy, like the world’s most delicious paint.
Step 4: The Long, Slow Dance
Return your beef to the pot along with any accumulated juices. Add the palm sugar and fish sauce, then bring everything to a gentle simmer. The key word here is gentle, we want lazy bubbles breaking the surface, not a rolling boil that’ll make your beef tough.
Cover the pot and let it do its thing for 1.5 to 2 hours. The beef should be fork-tender and the sauce should coat the back of a spoon. If it gets too thick, add a splash of water. Too thin? Remove the lid and let it reduce for the last 30 minutes.
Step 5: The Final Flourish
Stir in your bell pepper slices during the last 15 minutes of cooking. They should be tender but still have some bite. Add those sliced bird’s eye chilies if you’re feeling brave, they’ll give the dish a fresh heat that balances the rich coconut.
Right before serving, fold in the Thai basil leaves. They should wilt slightly but still be vibrant green. This adds a bright, almost licorice-like note that cuts through all that richness.
The Science Behind Your Coconut Red Curry Drip Beef

What we’re doing here is layering flavors to build complexity. When we brown the beef, we create new flavor compounds through the Maillard reaction, that’s the scientific name for the magic that happens when proteins and sugars get hot together.
We fry the curry paste in coconut fat, which is crucial because many aromatic compounds are fat-soluble. They literally can’t be released without fat to carry them. That’s why adding the thick coconut cream first makes such a difference.
The long, slow simmer breaks down the tough connective tissue in the beef through collagen hydrolysis. Sounds fancy, but it just means the tough stuff turns into gelatin, making each bite incredibly tender and giving the sauce body.
The coconut milk provides more than just richness. It contains natural emulsifiers that help bind the sauce together and create that glossy, restaurant-quality finish. The natural sugars in the coconut milk also caramelize slightly during cooking, adding subtle sweetness that balances the heat.
Traditional Thai cooking achieves this balance through what they call the “holy trinity” of sweet, sour, and salty. Our palm sugar brings sweetness, the lime juice adds sourness, and fish sauce provides that essential salty-umami backbone.
Tools That Make Perfect Coconut Red Curry Drip Beef
A heavy-bottomed Dutch oven or enameled cast-iron pot is worth its weight in gold for this recipe. The thick bottom distributes heat evenly, preventing hot spots that could scorch your curry paste. Plus, the heavy lid traps moisture perfectly during the long simmer.
Your food processor becomes your best friend for the curry paste. A good one will break down those tough lemongrass fibers and create a smooth paste. If you only have a blender, add a tablespoon of oil to help everything move around.
A wooden spoon is essential for stirring the curry paste as it cooks. Metal spoons can react with the acids in the paste and create off-flavors. Plus, wood won’t scratch your pot’s surface.
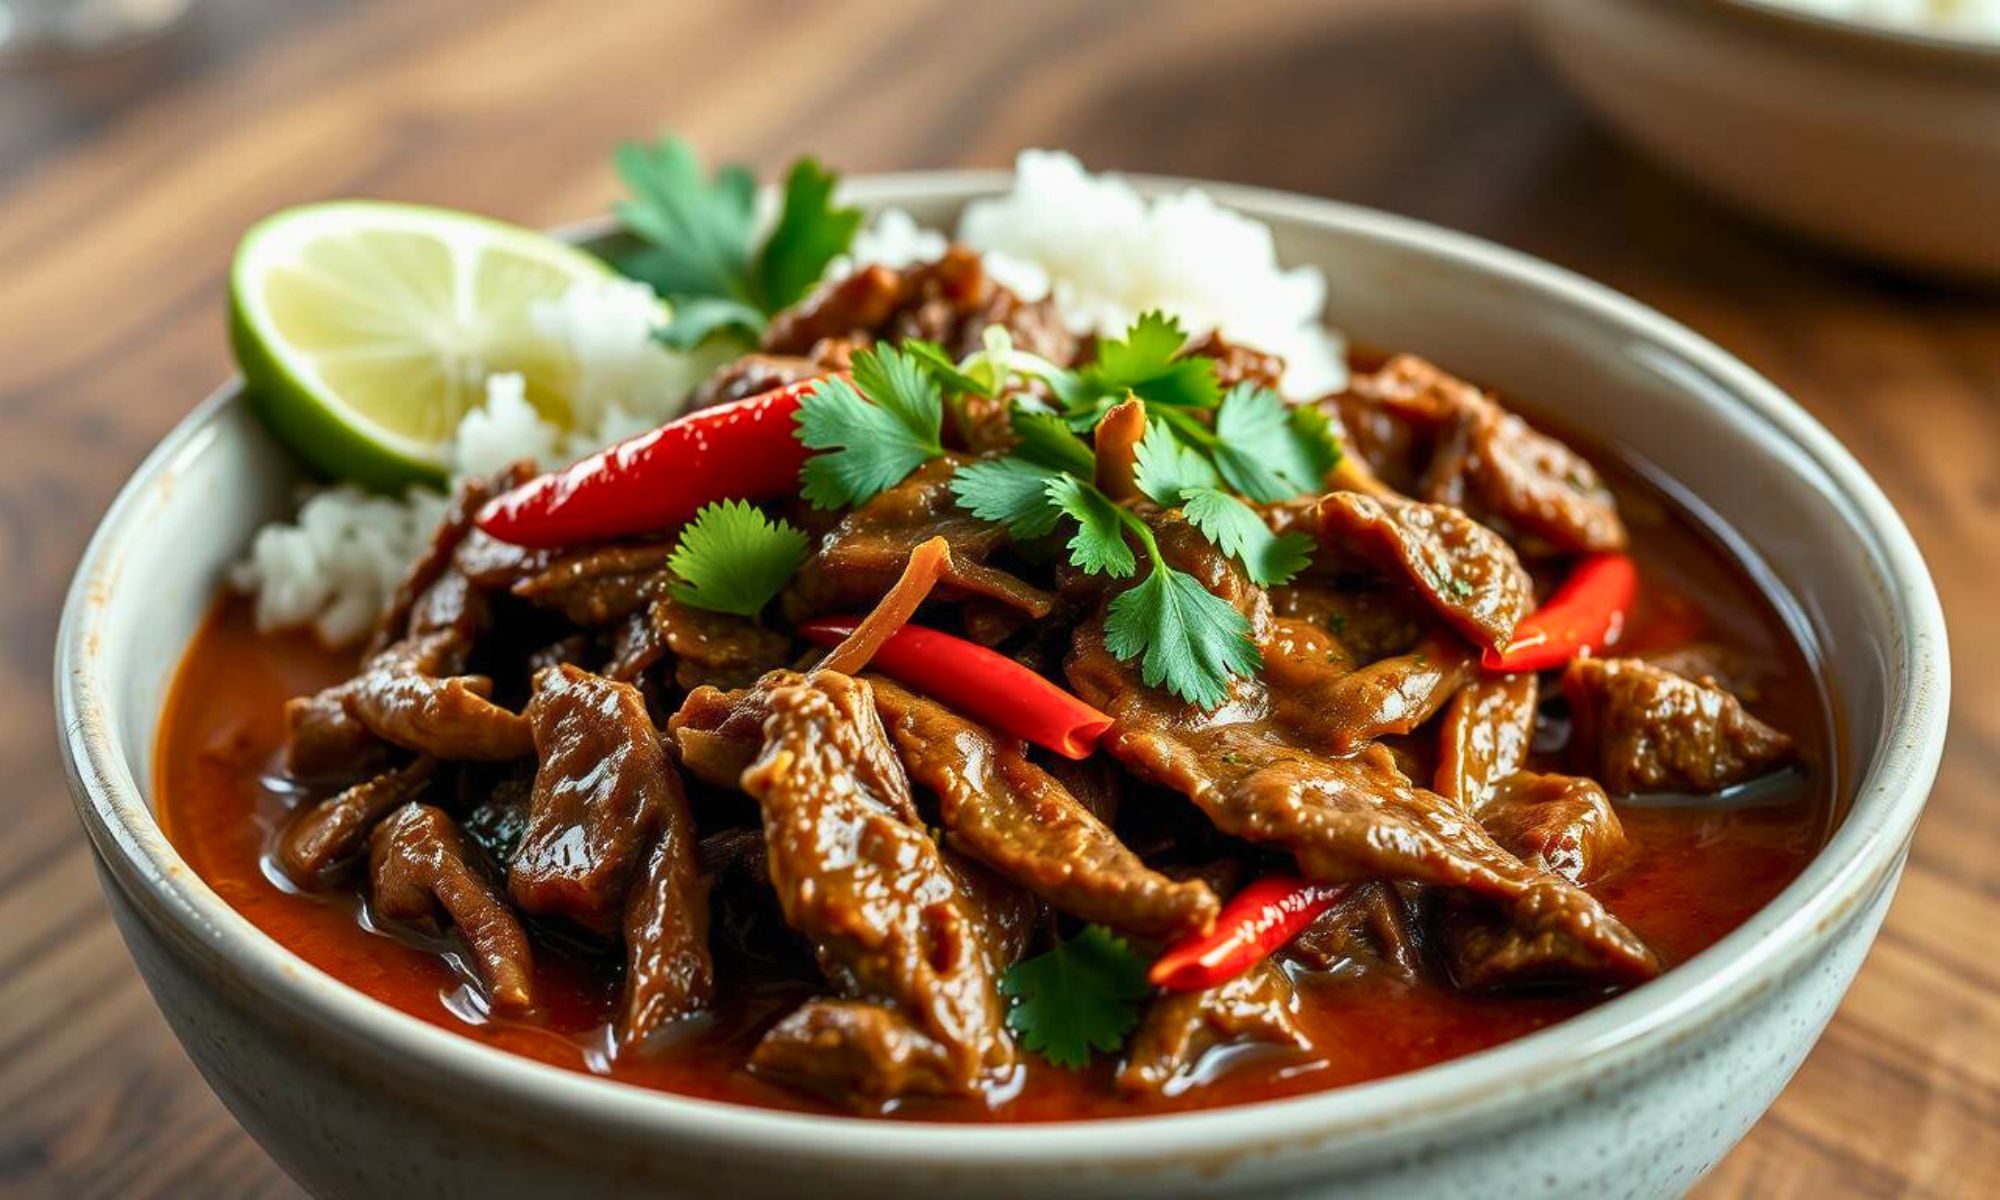
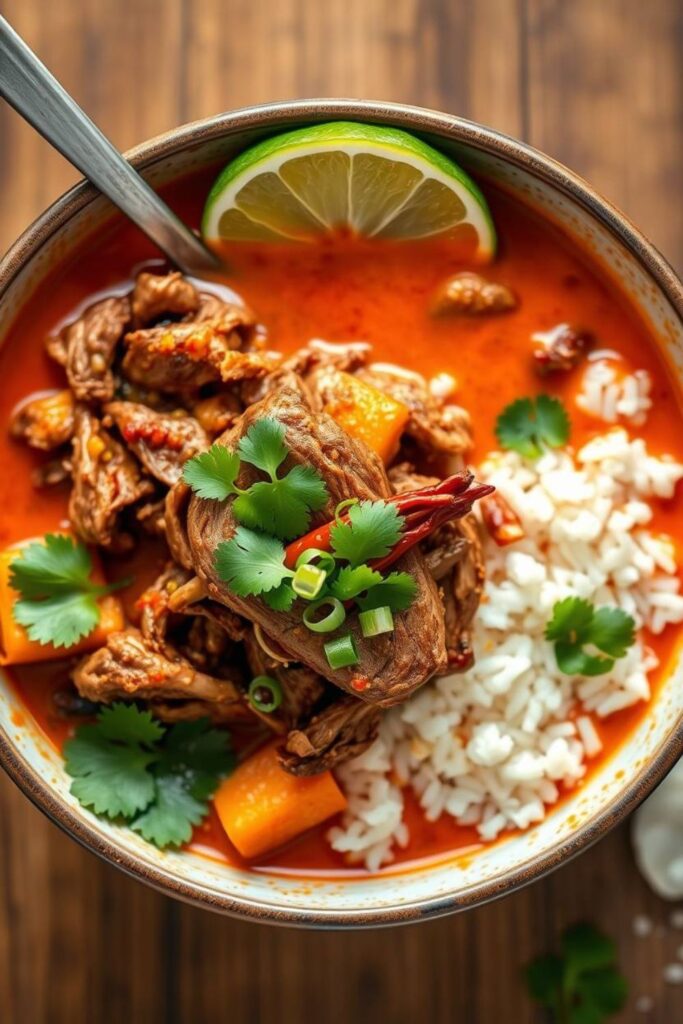
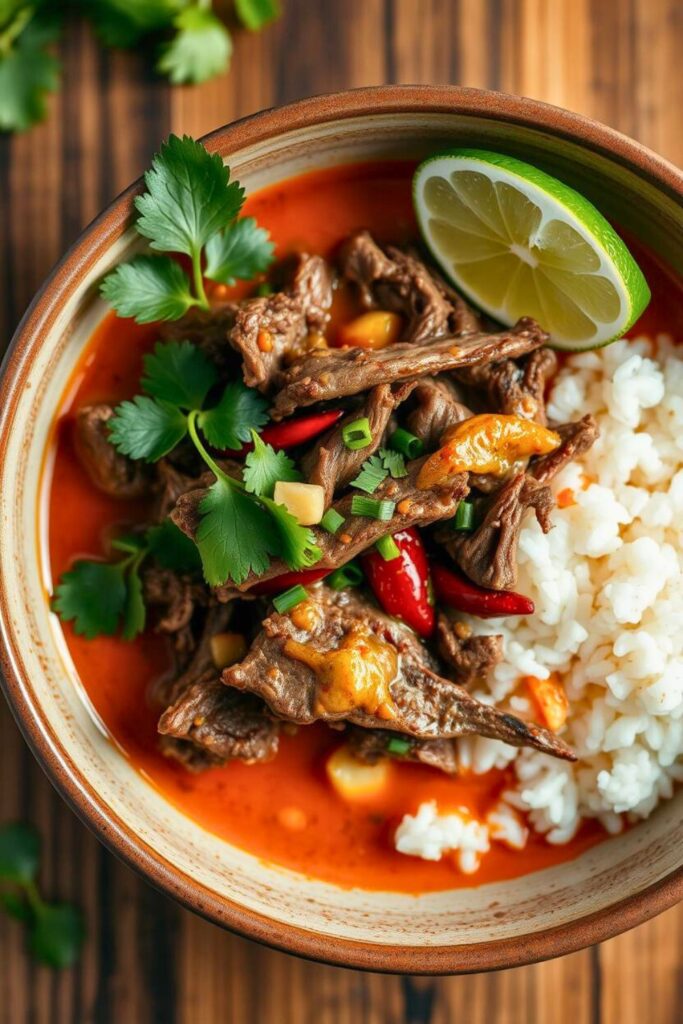
Making It Beautiful & Delicious
The presentation is where you get to show off a little. Serve this over jasmine rice, the fragrant, fluffy grains soak up that incredible sauce like little flavor sponges. Arrange the beef pieces on top so people can see those gorgeous, glossy-coated chunks.
Garnish with fresh Thai basil leaves, thin slices of red chili, and a lime wedge. The green herbs against the deep red sauce is absolutely stunning. If you’re feeling fancy, add a sprinkle of toasted coconut flakes or crushed peanuts for texture.
Wine pairing might seem weird with curry, but a crisp Riesling or Gewürztraminer works beautifully. The slight sweetness complements the coconut while the acidity cuts through the richness. Beer lovers should reach for a wheat beer or light lager, nothing too hoppy that’ll fight with the spices.
For sides, keep it simple. Cucumber salad with rice vinegar dressing provides cooling contrast. Steamed broccoli or green beans add color and fresh crunch. Som tam (green papaya salad) is traditional and adds bright, acidic notes that cleanse the palate.
Bringing It All Together
This Coconut Red Curry Drip Beef recipe isn’t just another dish to add to your collection, it’s a technique that’ll transform how you think about building flavors. The principles we’ve covered here, browning for depth, blooming spices in fat, layering liquids gradually, apply to countless other dishes.
The best part? This curry actually tastes better the next day. All those flavors have time to meld and marry overnight. Store it in the fridge for up to 4 days, or freeze portions for up to 3 months. Just reheat gently and add a splash of coconut milk if it seems too thick.
Once you’ve mastered the basic technique, the variations are endless. Try it with chicken thighs, pork shoulder, or even firm tofu for vegetarians. Add vegetables like eggplant, green beans, or bamboo shoots. Make it your own while keeping the fundamental principles intact.
Remember, cooking is about more than just following instructions. It’s about understanding why each step matters and how flavors work together. This Coconut Red Curry Drip Beef recipe teaches you to taste as you go, adjust seasonings, and trust your instincts. Those are skills that’ll serve you well in every dish you make.
Frequently Asked Questions
Can I make this curry paste ahead of time?
Absolutely! The paste actually improves with a day or two in the fridge. Make a double batch and freeze portions in ice cube trays. Pop out a cube whenever you want curry, it’ll keep for up to 6 months frozen. Just thaw it before using and maybe add a splash of fresh lime juice to brighten it up.
What if I can’t handle spicy food?
Start with fewer chilies in the paste, maybe 4 instead of 8. You can always add more heat later with fresh chilies, but you can’t take it out once it’s in there. The coconut milk helps tame the heat, so don’t skip on that. Some people add a spoonful of sugar to further balance the spice.
My sauce turned out too thin. How do I fix it?
Remove the lid and let it simmer uncovered for 15-20 minutes. The liquid will reduce and concentrate, thickening naturally. If you’re in a hurry, mix a tablespoon of cornstarch with 2 tablespoons of cold water and stir it in. Let it cook for 2 minutes to activate the starch.
Can I use light coconut milk instead of full-fat?
You can, but you’ll lose a lot of richness and that glossy finish we’re after. Light coconut milk is mostly water with some coconut flavor. If you must use it, add a tablespoon of butter or coconut oil to replace some of the missing fat. But honestly, full-fat coconut milk is worth the extra calories here.
The beef seems tough even after 2 hours. What went wrong?
This usually means the heat was too high during the simmer. Tough meat needs gentle heat to break down properly. If your beef is still tough, keep cooking at the lowest possible simmer, it might take another 30-60 minutes. Some cuts vary in toughness, so don’t be afraid to cook it longer until it’s fork-tender.

Swiftly Captions by Tina Smith — Quick, flavorful food recipes made simple, bringing fresh inspiration to your kitchen every day


