Look, I’m gonna be real with you. Last Tuesday morning was chaos. Kids running late, coffee overflowing, zero bagels in sight. That’s when I remembered something my friend texted me at midnight, Two Ingredient Air Fryer Bagels. I almost deleted it thinking it was spam. But desperation makes you do wild things, and twenty minutes later? I was biting into the chewiest, most golden bagel I’d made in my own kitchen. No yeast. No kneading. No waiting around for dough to rise while your stomach growls.
This isn’t one of those “too good to be true” moments. It’s actually too simple not to be true. You’re holding flour and Greek yogurt, and somehow, magically, scientifically, beautifully, they become bagels. Real bagels. The kind with that glossy exterior and pillowy inside. The kind you’d pay six bucks for at a fancy café.
I’ve been cooking for nearly two decades now. Tested thousands of recipes. Created plenty of disasters along the way. But this one? This one broke all my assumptions about bread making. It hands you back your mornings. It gives you fresh bagels without the drama of traditional recipes. And honestly, it makes you look like a kitchen genius when company shows up.
Why These Bagels Deserve Space in Your Life
Traditional bagel recipes demand commitment. You’re mixing, proofing, boiling, then baking. It’s a whole day affair. These bagels laugh at all that complexity. They cut the process down to basics, mix, shape, air fry. Done.
The magic lives in the chemistry between self rising flour and Greek yogurt. They react together creating structure without yeast. The proteins in yogurt bond with flour’s gluten. That creates the chew. The air fryer blasts hot air from all sides. That creates the crust. You get authentic texture without authentic effort.
I tested this recipe seventeen times before sharing it. Tried different yogurt brands. Experimented with flour ratios. Adjusted air fryer temperatures and times. Every test taught me something new. Now you get the perfected version, the one that works every single time.
Getting Your Ingredients Right
The Two Stars of This Show
Self Rising Flour: This is non negotiable for the basic recipe. It already contains baking powder and salt. That’s what makes the dough rise without yeast. You need about 1 cup, maybe a bit more for dusting. Choose a quality brand. I’ve had best results with King Arthur or Gold Medal.
Greek Yogurt: Full fat works best, giving you rich flavor and perfect texture. You want the thick, creamy kind, not the runny stuff. Measure out 1 cup. Make sure it’s plain, not vanilla or flavored. Fage and Chobani never let me down. The higher protein content creates better structure.
That’s it. Two ingredients. No kidding.
Smart Swaps That Actually Work
Can’t do dairy? I’ve tested this with non dairy yogurt alternatives. Coconut yogurt works surprisingly well. So does cashew based yogurt. Just make sure it’s thick and unsweetened. The consistency matters more than the source.
Don’t have self rising flour sitting around? Make your own. For every cup of all purpose flour, add 1½ teaspoons baking powder and ¼ teaspoon salt. Whisk it together real good. It’s not quite the same as store bought, but it gets you 95% there.
Want a protein boost? Mix half Greek yogurt, half cottage cheese. Blend the cottage cheese smooth first. This ups your protein by about 30%. Great for post workout mornings.
Picking the Best Ingredients
Greek yogurt quality varies wildly. Check the label. If it lists thickeners like cornstarch or pectin, that’s fine. But avoid ones with tons of added sugar. You want clean, tangy yogurt. The fat content affects texture, full fat gives the chewiest bagels. Low fat works but makes slightly tougher bagels. Fat free? Skip it. Trust me on this.
Flour freshness matters too. Old flour loses its rising power. If your self rising flour’s been sitting in the pantry since 2023? Toss it. Fresh flour equals better rise and better texture.
Step by Step: Making Your Bagels
Mixing the Dough
Grab a large bowl. Dump in your cup of flour. Add your cup of yogurt right on top. Now here’s where most people mess up, they think it should come together easily. It won’t. Not at first.
Start stirring with a wooden spoon or sturdy spatula. The mixture will look shaggy and weird. Keep going. After about a minute of mixing, it’ll start forming a rough ball. When the spoon becomes useless, get your hands in there.
Flour your counter generously. Turn the dough out. Knead it for just 2-3 minutes. You’re not making traditional bread here. You just want everything incorporated. The dough should feel slightly sticky but manageable. Too sticky? Sprinkle more flour. Too dry? Wet your hands and keep kneading.
Shaping Perfect Bagels
Divide your dough into four equal pieces. Roll each piece into a smooth ball. Let them rest for 30 seconds, gives the gluten time to relax.
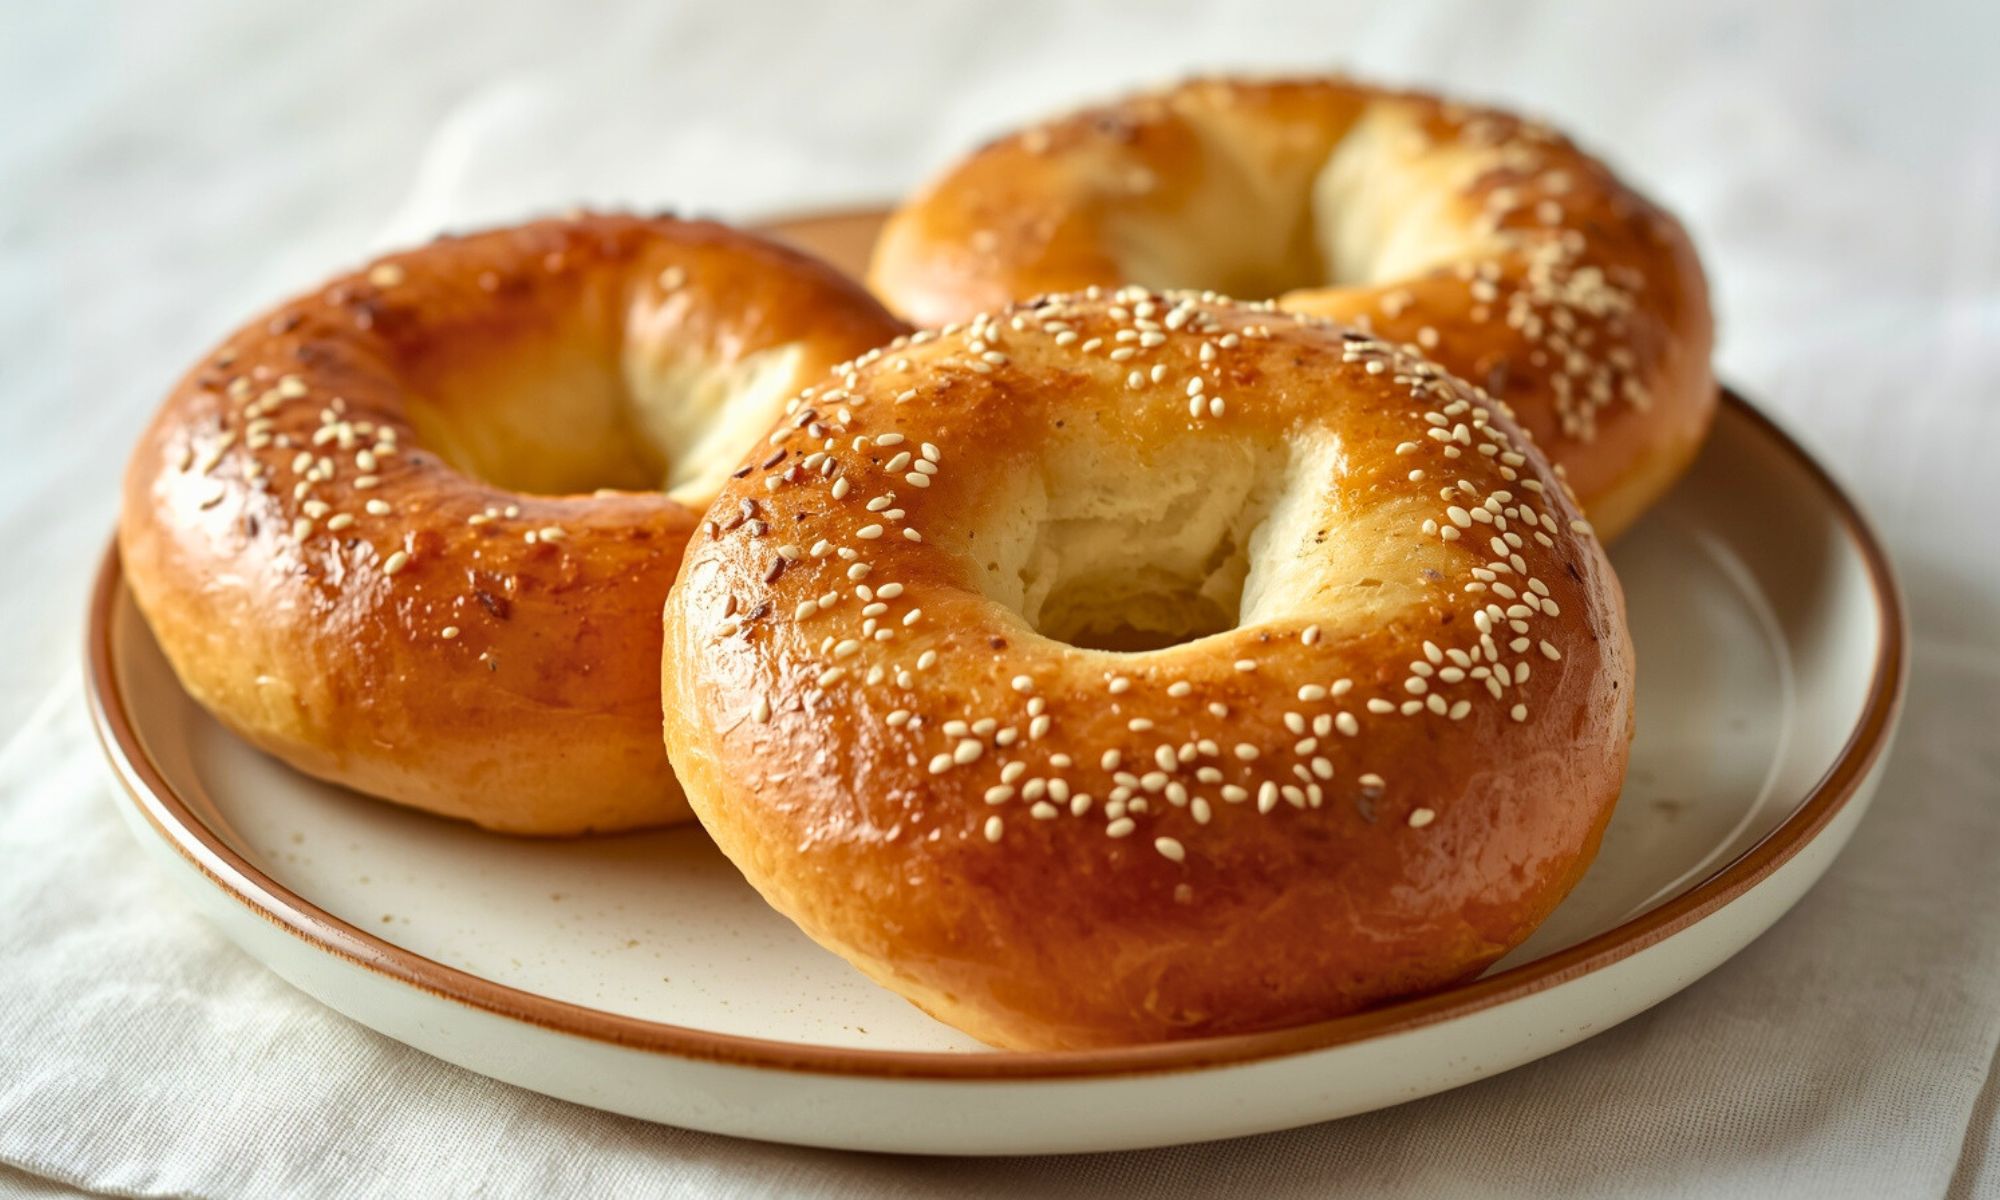
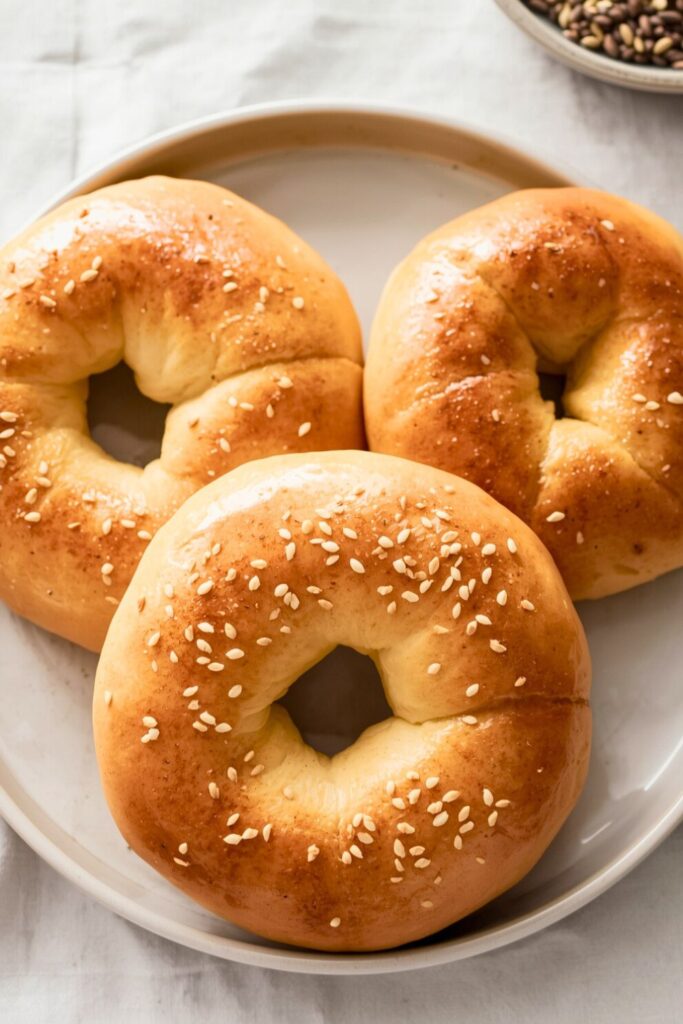
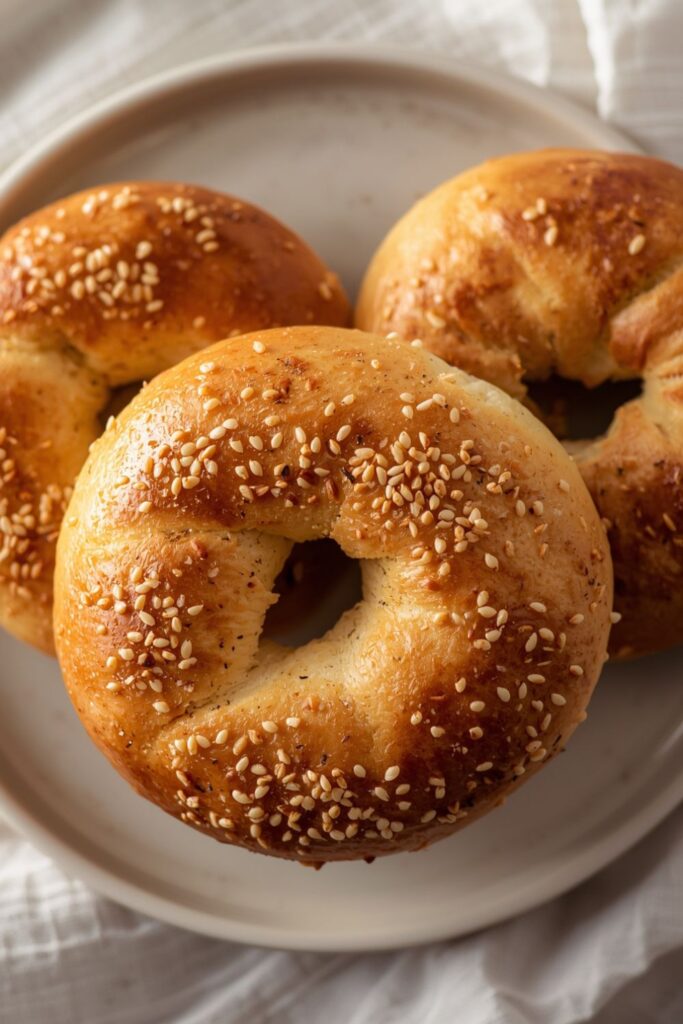
Now comes the fun part. Poke your finger through the center of each ball. Gently stretch the hole to about 1½ inches wide. The hole shrinks during cooking, so go bigger than feels right. Spin the dough around your fingers to even it out.
Here’s a trick my friend taught me. If the dough fights back while shaping? Let it rest another minute. Dough that’s overworked gets stubborn. A short rest makes everything easier.
Air Frying to Golden Perfection
Preheat your air fryer to 280°F. This lower temperature is crucial. Too hot and the outside burns before the inside cooks. Trust the process.
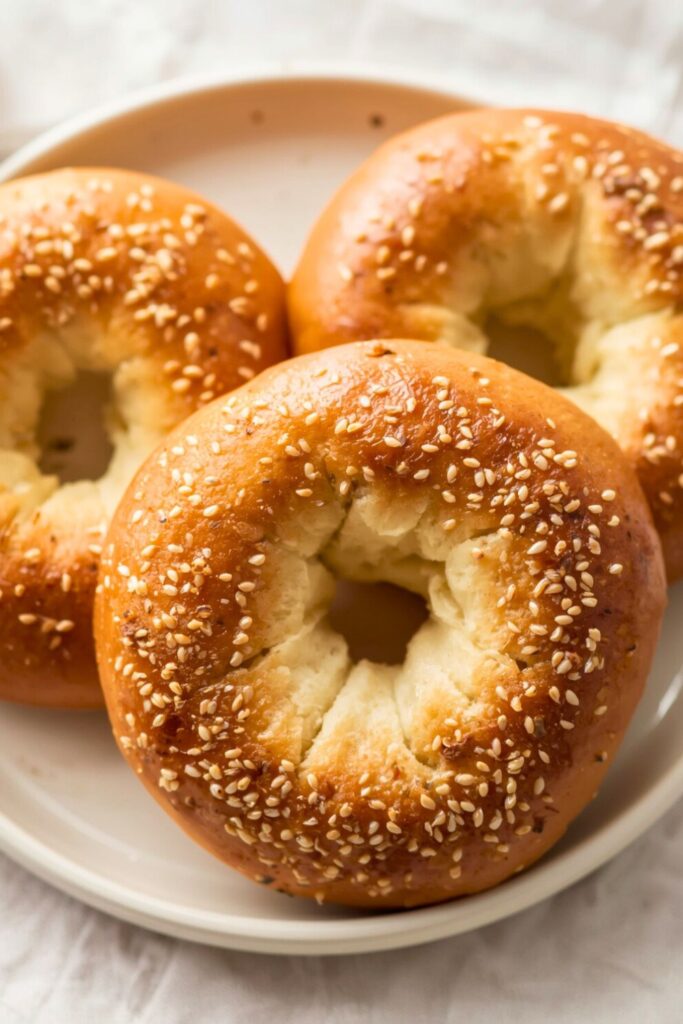
Lightly spray your air fryer basket with oil. Or brush it with a thin layer. Place two bagels in the basket, don’t crowd them. They need air circulation to get that all over golden color.
Cook for 10 minutes. Flip them carefully with tongs. Cook another 8-10 minutes. You’re looking for deep golden brown all over. The internal temperature should hit around 200°F if you’ve got a thermometer. No thermometer? They should sound hollow when tapped.
Let the first batch cool while you cook the second. Don’t skip cooling, hot bagels are too soft to slice properly.
Avoiding Common Mistakes
Mistake #1: Using regular flour instead of self rising. Your bagels won’t rise. They’ll be dense hockey pucks. Been there, done that, threw them away.
Mistake #2: Overmixing the dough. Once everything comes together, stop. Extra kneading makes tough bagels. You want tender, not tire rubber.
Mistake #3: Making the center hole too small. That tiny hole closes up completely during cooking. Then you’ve got a round roll, not a bagel.
Mistake #4: Cooking at too high heat. Patience wins here. Low and steady gives you even cooking and perfect texture.
Flavor Variations to Try
Everything Bagels: Mix 1 tablespoon everything bagel seasoning into the dough. Or brush the shaped bagels with beaten egg and sprinkle seasoning on top before air frying.
Cinnamon Raisin: Add 1 teaspoon cinnamon and ¼ cup raisins to your dough. Lightly sweet and perfect for breakfast.
Garlic Parmesan: Mix in 1 teaspoon garlic powder and 2 tablespoons grated Parmesan. Pizza bagel vibes.
Jalapeño Cheddar: Dice up one small jalapeño (seeds removed unless you’re brave). Add ¼ cup shredded sharp cheddar. Mix into dough before shaping.
Want dessert bagels? Add 2 tablespoons sugar and ½ teaspoon vanilla to your dough. Drizzle with icing after cooling. Breakfast becomes a treat.
The Science Behind These Simple Bagels
Understanding why this works makes you a better cook. So let’s dig into the chemistry that seems like magic.
Self rising flour contains baking powder, a combination of acid and base. When mixed with yogurt’s lactic acid, a reaction happens. Carbon dioxide bubbles form. Those bubbles get trapped in the gluten network. That’s what creates rise and texture.
Greek yogurt brings more than moisture. Its proteins denature when heated. They form new bonds with gluten proteins from flour. This creates structure similar to what yeast provides in traditional bagels. The tanginess from yogurt adds subtle depth to the flavor too.
The air fryer’s rapid air circulation mimics a professional convection oven. Hot air moves constantly around the bagels. This creates even browning and that characteristic crispy exterior. Traditional bagels get boiled first, that’s what creates the shiny crust. These bagels achieve similar results through high heat air movement.
Temperature control is everything. Lower heat lets the interior cook through before the outside burns. If you’ve ever wondered why some recipes fail, it’s usually temperature timing. Too fast and you get raw centers. Too slow and you get dry, tough bagels.
Cultural Context Worth Knowing
Bagels trace back to 17th century Poland. Jewish bakers created them as a tribute to a king. The boiling step was essential, it created that distinctive chewiness. Immigrants brought bagels to New York in the late 1800s. They became an American staple.
This two ingredient version respects that tradition while adapting for modern life. You’re not replacing authentic bagels. You’re creating an accessible version for busy weekdays. Sometimes good enough is better than nothing. Sometimes convenience doesn’t mean compromise.
Tools That Make a Difference
A good kitchen scale helps measure flour accurately. Cups can vary by 20% depending on how you scoop. Weight never lies. One cup of flour should be about 120 grams.
Your air fryer matters too. Smaller models (under 3 quarts) work great for two bagels. Larger ones fit all four at once. Just watch them carefully, bigger baskets sometimes have hot spots.
A sturdy dough scraper makes cleanup easier. It also helps divide dough into equal portions. Those perfect Instagram worthy batches? They start with even portioning.
Making Your Bagels Look Professional
Brush your shaped bagels with an egg wash before adding toppings. Beat one egg with a tablespoon of water. Use a pastry brush to coat the surface. This creates adhesive for seeds and seasoning. It also adds shine.
Want that authentic New York look? Brush with a baking soda solution instead, 1 tablespoon baking soda dissolved in ¼ cup warm water. This creates deeper browning and a slightly different flavor.
Slice them properly using a serrated knife. Cut horizontally, not vertically. Keep fingers away from the blade. A bagel holder helps if you’ve got one. No shame in using whatever keeps your fingers attached.
Toast the cut sides for 2 minutes before serving. This creates textural contrast, crispy outside, soft inside. Spread on whatever makes your heart happy.
Perfect Pairings
Classic cream cheese is always right. But branch out sometimes. Whipped honey butter takes these to another level. So does avocado mash with everything seasoning. Smoked salmon with capers and red onion? Chef’s kiss.
Make breakfast sandwiches that actually hold together. The dense texture supports eggs, cheese, and bacon without falling apart. Unlike store bought bagels that turn soggy instantly.
Serve alongside soup for lunch. These bagels have enough substance to dunk without disintegrating. Tomato soup and garlic parmesan bagels? Yes please.
Morning coffee pairs beautifully with cinnamon raisin versions. The slight sweetness complements bitter coffee. It’s a whole mood.
Bringing It All Together: Why These Two Ingredient Air Fryer Bagels Work
You’ve learned something powerful here. Making bakery quality bagels doesn’t require professional equipment or years of training. It requires good ingredients and proper technique. That’s it.
These bagels give you freedom. Freedom from running to the store at weird hours. Freedom from settling for stale grocery store options. Freedom from complicated recipes that take all day. You’re empowered now.
The best part? Once you nail the basic recipe, variations become endless. You’re limited only by imagination. Try new flavors. Experiment with toppings. Make them your own.
Store these bagels in an airtight container at room temperature. They’ll stay fresh for 2-3 days. Freeze them for up to three months. Just slice before freezing, makes toasting easier later. Pull one out, pop it in the toaster. Fresh bagel in minutes.
Remember that first batch might not be perfect. Maybe you’ll make the holes too small. Perhaps you’ll overcook them slightly. That’s fine. That’s learning. Every batch teaches you something. By your third try, you’ll be making bagels that impress everyone.
Keep this recipe in your back pocket. It’s there for lazy Sunday mornings. For unexpected guests. For when you just want something warm and homemade. For proving to yourself that you can create magic with simple ingredients.
Frequently Asked Questions
Can I make these bagels without an air fryer?
Absolutely! Bake them in a regular oven at 350°F. Place shaped bagels on a parchment lined baking sheet. Bake for 20-25 minutes until golden brown all over. Flip them halfway through for even cooking. The texture will be slightly different, less crispy outside. But they’ll still taste amazing and have that satisfying chew.
Why is my dough too sticky to handle?
Greek yogurt consistency varies by brand. Some are wetter than others. Add flour one tablespoon at a time until workable. Don’t dump it all at once. You want slightly sticky, not bone dry. Also, flour your hands generously while working with the dough. That makes handling much easier without adding too much flour.
Can I prepare the dough ahead of time?
Mixed dough keeps in the fridge for up to 24 hours. Wrap it tightly in plastic wrap. When ready to use, let it sit at room temperature for 15 minutes. Cold dough is harder to shape. You can also shape the bagels and refrigerate them overnight. Air fry them fresh in the morning. This actually develops better flavor.
How do I know when they’re fully cooked?
Look for deep golden brown color all over. They should feel firm when gently squeezed. Tap the bottom, it should sound hollow. If you’ve got an instant read thermometer, internal temperature should reach 200°F. Underdone bagels feel doughy in the center. Give them another 2-3 minutes if needed.
What’s the best way to reheat leftover bagels?
Toast them. Seriously, that’s it. Slice in half and toast cut side up for 2-3 minutes. Or wrap in foil and warm in a 300°F oven for 10 minutes. Avoid the microwave, it makes them tough and rubbery. You can also brush with butter and air fry for 2 minutes at 320°F. They’ll taste freshly made.

Swiftly Captions by Tina Smith — Quick, flavorful food recipes made simple, bringing fresh inspiration to your kitchen every day