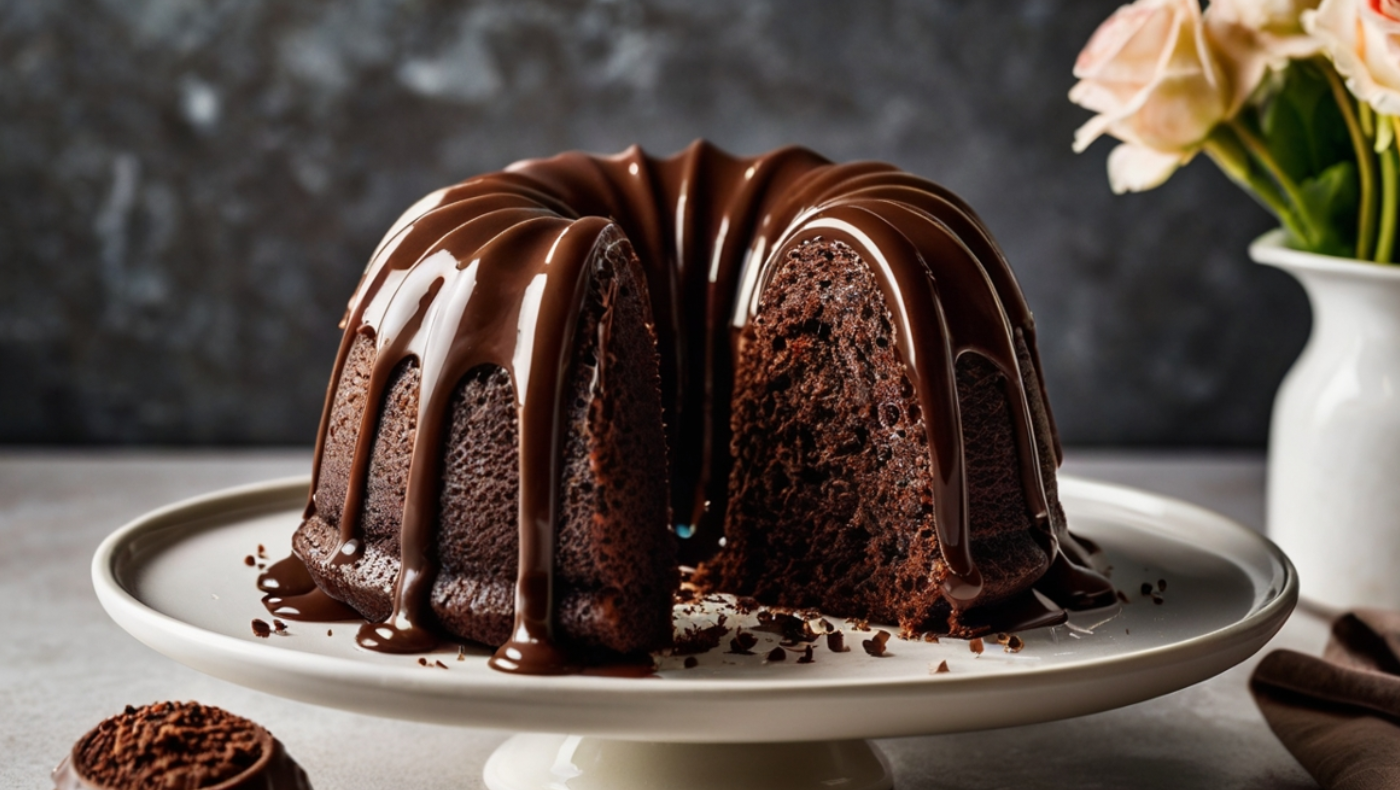
The first slice into a Chocolate Bundt Cake Sensation is pure dessert drama. The slight resistance of the knife, then the reveal, moist, rich, and deeply fudgy. It’s a full sensory hit.
My love for the Chocolate Bundt Cake Sensation began at age seven, watching my grandmother lift one from her old pan. The aroma was thick and unforgettable.
This cake is a contradiction, simple yet elegant, familiar yet striking. Its dramatic ring shape has captivated bakers since the ’50s, with roots in European traditions.
What sets it apart isn’t just the pan. It’s the blend of bold chocolate flavor, ultra moist crumb, and a silhouette that steals the show before the first bite.
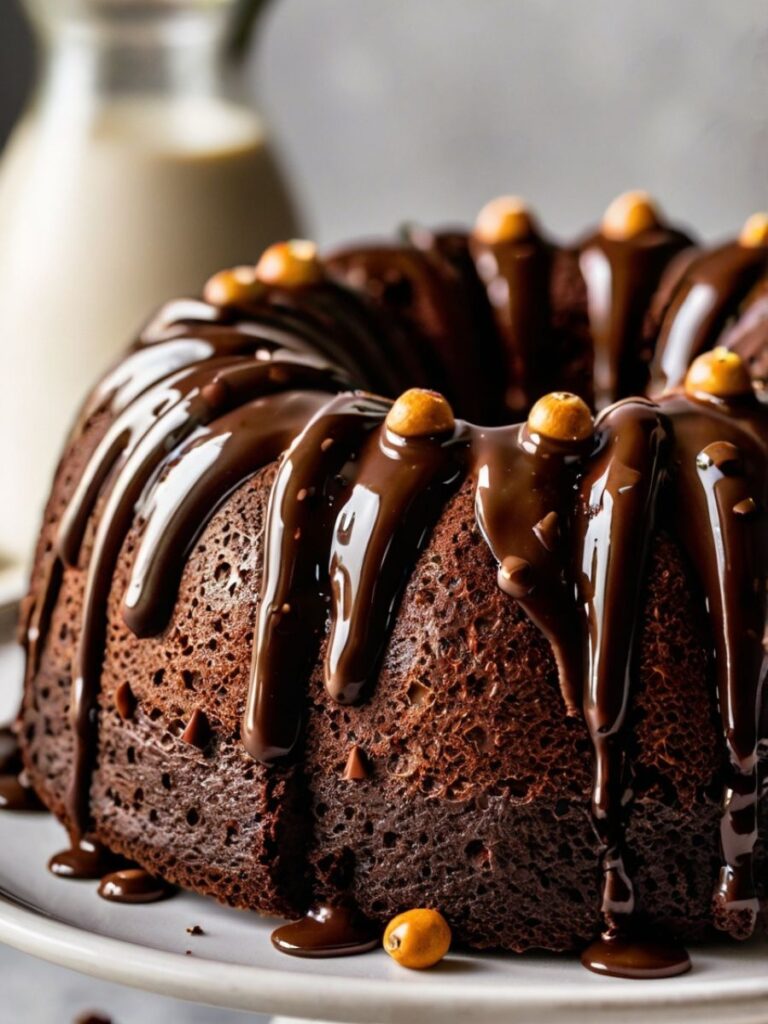
Those ridges aren’t just decorative. They create caramelized edges that contrast the soft center. It’s where form meets flavor in perfect sync.
This isn’t just chocolate cake. It’s a chocolate experience.
1. Ingredients & Substitutions

The Foundation: Flour and Leavening
All purpose flour serves as the backbone of most chocolate bundt cake recipes (2-3 cups, typically). For a truly exceptional crumb, consider swapping up to half with cake flour, which creates a more delicate texture due to its lower protein content. If you’re seeking a sturdier, denser cake, something closer to pound cake consistency, bread flour can be your secret weapon, but limit it to about 25% of your total flour to avoid heaviness.
Leavening usually combines baking soda and baking powder (1-2 teaspoons of each). Baking soda requires acidity to activate, which comes from buttermilk or sour cream in the batter, while baking powder works independently. Fresh leavening agents are non negotiable; they loose potency over time, often leading to the disappointingly flat cakes bakers sometimes encounter.
A pinch of salt (½-1 teaspoon) isn’t just tradition, it’s essential chemistry. Salt enhances the chocolate notes while tempering sweetness, creating crucial balance. Diamond Crystal kosher salt is my preference for baking, but any salt works, provided you adjust quantities according to crystal size.
The Star: Chocolate Components
The chocolate triumvirate in an exceptional bundt typically includes cocoa powder (½-¾ cup), melted chocolate (4-8 ounces), and sometimes chocolate chips (1 cup) for textural interest. Dutch processed cocoa delivers a deeper color and smoother flavor profile then natural cocoa, though the latter provides more pronounced acidity that can brighten the chocolate notes. In a pinch, you can substitute one for the other, but remember to adjust leavening accordingly natural cocoa works with baking soda, while Dutch processed pairs better with baking powder.
For melted chocolate, nothing beats the complexity of 60-70% cacao semisweet or bittersweet varieties. Chocolatiers will notice significant differences between origins. Madagascar chocolate brings fruity brightness, while Venezuelan varieties offer nutty, caramel undertones. Chopped bar chocolate melts more consistently than chips, which contain stabilizers to maintain their shape during baking.
When budget constrains, quality cocoa powder delivers more impact per dollar than premium bar chocolate. If you’re choosing where to allocate resources, this is where to invest.
The Moisture Makers: Fat and Liquid
Butter (1-1½ cups) provides incomparable flavor, but neutral oils (1 cup) create a moister crumb that maintains tenderness even after refrigeration. Many master recipes combine both butter for flavor, oil for texture. If replacing butter with oil, use about 25% less oil by volume.
Dairy components typically include buttermilk, sour cream, or yogurt (1-1½ cups). These acidic dairy products not only activate leavening but also tenderize the crumb through protein breakdown. In the absence of these ingredients, regular milk with a tablespoon of vinegar or lemon juice per cup creates a workable substitute, altho the tang won’t be quite identical.
Coffee (½-1 cup) often appears in chocolate cake recipes not to add coffee flavor but to intensify chocolate notes. The compounds in coffee enhance similar flavor molecules in chocolate. Water works as a substitute, but you’ll sacrifice depth. For alcohol variations, consider replacing a quarter of your liquid with stout beer, bourbon, or Kahlúa; each brings a distinctive character.
The Sweet Elements: Sugar and Additions
Granulated sugar (1½-2 cups) provides sweetness and structure while contributing to moisture retention. Brown sugar (½-1 cup) adds caramel notes and extra moisture from its molasses content. A combination creates ideal complexity. If reducing sugar, don’t go below 25% reduction, as sugar plays structural and preservative roles beyond sweetness.
Eggs (3-4 large) provide structure, leavening, and richness. For vegan adaptations, aquafaba (3 tablespoons per egg) or commercial egg replacers work surprisingly well in chocolate cakes, as the strong chocolate flavor masks any subtle differences.
Vanilla extract (1-2 teaspoons) isn’t merely traditional it amplifies chocolate flavors through complementary aromatic compounds. True vanilla extract vastly outperforms imitation, and the difference becomes particularly noticeable in chocolate desserts. Almond extract (¼-½ teaspoon) can add intriguing complexity when used alongside vanilla.
2. Step by Step Instructions
Preparation Phase
Begin with all ingredients at room temperature particularly butter, eggs, and dairy. This crucial but often overlooked step ensures proper emulsification and consistent texture throughout your batter. Remove refrigerated items at least one hour before beginning (30 minutes in warm kitchens).
Prepare your bundt pan with meticulous attention. Standard bundt pans hold 10-12 cups, though mini and larger variations exist. The pan’s intricate design demands careful greasing use softened butter applied with a pastry brush to reach every crevice, followed by a light dusting of cocoa powder (not flour, which would leave visible white residue). Commercial baking sprays containing flour work admirably, but avoid basic cooking sprays which lack the flour component necessary for clean release.
Position your oven rack in the center position and preheat to 350°F (175°C). Convection settings should be avoided or adjusted down 25°F, as the forced air can cause uneven rising or excessive browning before the interior sets.
Mixing Methodology
Begin by whisking dry ingredients (flour, cocoa powder, leavening agents, salt) in a medium bowl. This aerates the mixture and eliminates potential cocoa lumps that resist incorporation once liquid is added. Many bakers skip sifting cocoa and flour, but a quick whisk serves the same purpose more efficiently.
In your main mixing bowl, cream room temperature butter with sugars until truly light and fluffy, about 3-5 minutes with a stand mixer, not the 30 seconds many home bakers allow. This process creates millions of microscopic air pockets that provide crucial structure. Add eggs one at a time, incorporating fully between additions. The mixture may look slightly curdled after egg addition; this is normal and will smooth out with flour addition.
For melted chocolate incorporation, allow it to cool slightly before adding to prevent cooking eggs or melting butter. When adding dry ingredients, alternate with liquid components (buttermilk, coffee, etc.) in three additions, beginning and ending with dry ingredients. This prevents gluten from developing too rapidly, which would create a tough crumb.
Mix only until ingredients just combine overmixing activates gluten and deflates those precious air bubbles you’ve worked to create. Fold in any chocolate chips or nuts with a spatula rather than the mixer for minimal agitation.
Baking Considerations
Transfer batter to your prepared pan, filling no more than two thirds full to allow for expansion. Tap the filled pan gently against the counter several times to release trapped air bubbles, particularly important for properly defining those distinctive bundt ridges.
Bake at 350°F for approximately 45-55 minutes, but never rely solely on timing. Begin checking for doneness at the 40 minute mark by inserting a wooden skewer or thin knife into the thickest part of the cake. It should emerge with a few moist crumbs but no wet batter. The cake will also begin to pull away slightly from the pan edges when done.
Resist the temptation to open the oven during the first 30 minutes of baking temperature fluctuations can cause uneven rising or sinking. If your cake browns too quickly, tent loosely with aluminum foil for the remaining bake time.
Cooling and Unmolding
Allow the cake to cool in its pan on a wire rack for precisely 10-15 minutes no less, no more. This critical timing allows the structure to set while the cake remains warm enough to release cleanly. Cooling too long in the pan leads to sticking as the cake contracts against the metal.
To unmold, place your cooling rack on top of the cake pan, then carefully but confidently invert both together in one swift motion. Wait about 5 minutes before gently lifting the pan away. If the cake doesn’t release immediately, don’t force it; tap the pan firmly on several sides and try again. For stubborn cases, run a thin flexible spatula around edges or place a hot, damp towel on the pan bottom briefly to create steam that helps release.
Allow the cake to cool completely (minimum 2 hours) before glazing or storing. Attempting to glaze while warm results in a thin, absorbed glaze rather than an attractive finish.
3. Cooking Techniques & Science
The Chemistry of Chocolate Cake
The exceptional moisture in chocolate bundt cakes stems from cocoa powder’s ability to absorb liquid, up to twice its weight. This creates a cake that stays fresh longer than vanilla counterparts. Cocoa also contains emulsifying agents (similar to lecithin) that help suspend fat particles throughout the batter, contributing to that characteristic velvety texture.
Chocolate’s acidity impacts leavening significantly. Natural cocoa registers at pH 5.0-6.0, activating baking soda through acid base reactions that release carbon dioxide, creating lift. Dutch processed cocoa, having been alkalized to pH 7.0-8.0, requires baking powder’s independent leavening action. This explains why recipes specifying Dutch processed cocoa typically include more baking powder than those using natural cocoa.
Temperature control affects chocolate flavor development dramatically. The Maillard reaction, that complex dance between proteins and sugars under heat, creates hundreds of aromatic compounds that define great chocolate baking. For optimal flavor development, ensure your oven has fully preheated and maintain a consistent temperature throughout baking.
Bundt Pan Technology and Considerations
The bundt pan’s distinctive design creates unique baking dynamics. Its central tube conducts heat to the cake’s interior, effectively cooking the cake from both outside and inside simultaneously. This reduces baking time compared to regular layer cakes of similar volume and ensures more even doneness.
Material composition matters tremendously. Traditional aluminum pans conduct heat efficiently but can cause over browning with dark batters. Darker non stick finishes absorb more heat, potentially creating too crisp exteriors before the center sets. If using dark pans, reduce oven temperature by 25°F as compensation.
Pan age impacts performance over time. Well used non stick pans gradually lose their release properties, even with proper care. If your previously reliable pan suddenly produces sticking cakes, it may be time for replacement. Vintage cast aluminum bundt pans from the 1950s 60s, treasured by collectors, often perform better than modern counterparts due to their heavier construction and heat distribution properties.
Glaze Engineering
The perfect glaze requires balancing viscosity and setting properties. For a classic chocolate ganache, the ratio of chocolate to cream determines thickness; equal parts create a truffle like coating that sets firmly, while increasing cream (up to 2:1 cream: chocolate) produces a pourable glaze that sets with a slight sheen.
Temperature controls how your glaze behaves on the cake. Apply at around 90-95°F for optimal coating that settles into decorative ridges while remaining thick enough not to simply run off. Too warm (above 100°F), and it slides right off; too cool (below 85°F), and it won’t flow into the cake’s crevices properly.
For non chocolate glazes, powdered sugar serves as the base (1-2 cups), combined with liquid (3-4 tablespoons) and fat (1-2 tablespoons butter or cream) for shine and flavor. The key technique many home bakers miss is allowing the mixture to sit 5 minutes before adjusting consistency powdered sugar absorbs liquid gradually, often thickening a seemingly too thin glaze without additional ingredients.
4. Serving & Pairing Suggestions
Presentation Strategies
The bundt’s architectural presence demands thoughtful presentation. For traditional service, a simple dusting of powdered sugar highlights the cake’s dramatic curves apply through a fine mesh sieve from a height of about 6 inches for even distribution. For glazed cakes, consider layering contrasting colors; a white vanilla glaze over dark chocolate creates striking definition.
Serve slices on plates with intentional accompaniments, fresh berries provide color contrast and bright acidity against rich chocolate, while quenelles of lightly sweetened whipped cream add textural counterpoint. A light dusting of cocoa powder or gold edible dust on the plate creates restaurant quality presentation with minimal effort.
When transporting bundts, leverage their structural integrity. Unlike layer cakes, bundts travel exceptionally well, making them ideal for potlucks and gatherings. Transport unglazed if possible, applying finish at destination for maximum visual impact.
Flavor Pairings and Accompaniments
Chocolate’s complex flavor profile opens countless pairing possibilities. Fresh raspberry sauce creates a classic contrast through bright acidity and visual drama. Coffee and chocolate’s natural affinity extends to serving suggestions, a small espresso alongside intensifies chocolate notes through complementary flavor compounds.
For adult gatherings, consider alcohol pairings. Bourbon’s caramel and vanilla notes complement chocolate’s depth, while ruby port’s fruit forward sweetness balances cocoa’s slight bitterness. For non alcoholic options, Earl Grey tea’s bergamot brightness cuts through chocolate richness effectively.
Temperature variations transform the eating experience. Room temperature showcases delicate flavor notes, while slightly warmed (10 seconds in microwave) activates aromatic compounds, intensifying chocolate perception. For summer service, semi frozen bundt slices create a fudge like consistency that refreshes without sacrificing flavor intensity.
Storage Considerations
Properly stored, chocolate bundt cakes improve over 1-2 days as flavors meld and moisture equilibrates throughout the crumb. Store unglazed cakes under a cake dome at room temperature up to three days, or glazed cakes in covered containers to protect finishes.
For longer storage, freezing produces excellent results unlike many baked goods. The high fat and moisture content prevents freezer damage, making bundts ideal make ahead desserts. Wrap unglazed cakes thoroughly in plastic film then aluminum foil before freezing up to three months. Thaw overnight in refrigerator, then bring to room temperature before serving or glazing.
Refrigeration, counterintuitively, accelerates staling through retrogradation of starches, despite preserving freshness from a food safety perspective. If refrigeration becomes necessary, allow cake to fully return to room temperature before serving to restore optimal texture and flavor release.
Conclusion
The first slice into a Chocolate Bundt Cake Sensation delivers pure dessert drama. Your knife meets a slight resistance, then reveals a moist, rich, and deeply fudgy center. It’s a full sensory experience.
I fell in love with the Chocolate Bundt Cake Sensation at age seven, watching my grandmother lift one from her old pan. The aroma filled the kitchen thick, warm, and unforgettable.
This cake blends contradictions: it’s simple yet elegant, familiar yet bold. Its iconic ring shape has wowed bakers since the 1950s and traces back to European traditions.
What sets a true Chocolate Bundt Cake Sensation apart isn’t just the pan, it’s the deep chocolate flavor, velvety crumb, and the stunning silhouette that turns heads before the first bite.
Its ridges don’t just look pretty. They caramelize slightly, adding crisp edges that contrast beautifully with the soft, moist interior.
A Chocolate Bundt Cake Sensation isn’t just a cake, it’s a memory in every bite.
FAQs
Why did my bundt cake stick to the pan despite greasing?
Bundt pans require meticulous preparation due to their intricate designs. Use a combination of shortening (which has better staying power than butter) and cocoa powder, reaching every crevice. Allow cakes to cool exactly 10-15 minutes before unmolding too short and they’re fragile, too long and they contract against the pan.
Can I make this cake a day ahead?
Absolutely! Chocolate bundt cakes actually improve overnight as flavors meld. Store unglazed at room temperature under a cake dome, then add glaze shortly before serving for freshest appearance. The high moisture content keeps it fresh for 2-3 days without refrigeration.
How can I intensify the chocolate flavor without making it too sweet?
Add 1-2 tablespoons of espresso powder to the batter, it enhances the chocolate flavor without adding coffee taste. Another trick is adding ¼ teaspoon almond extract alongside vanilla, which mysteriously deepens chocolate perception. Finally, use high quality cocoa powder with at least 22-24% fat content for the richest results.
What’s the best way to prevent a domed bottom when the cake is turned out?
That dome forms when batter rises unevenly. Create a more level cake by running a spatula through the batter after pouring it into the pan to eliminate air pockets. Also, fill the pan only ⅔ full, and tap it firmly on the counter several times before baking to force air bubbles to the surface

Swiftly Captions by Tina Smith — Quick, flavorful food recipes made simple, bringing fresh inspiration to your kitchen every day