No big plans. Just a quiet evening, a little leftover coffee on the counter, and that familiar craving creeping in, something warm, sweet, and easy. You’re not in the mood for mixers or a sink full of dishes. Just a simple treat you can pull together without overthinking it. That’s when the idea hits: a chocolate chip skillet cookie. Not individual scoops, not another baking project, just one pan, one spoon, and a chocolate chip skillet cookie that’s equal parts cozy and satisfying.
I’ve come back to this recipe more times than I can count. It started on one of those slow, in between nights, too late for baking from scratch, too early to call it a day. I had just enough butter, a handful of chocolate chips, and my favorite cast iron pan staring back at me. No measuring cups out, just a wooden spoon, a bowl, and a little hope that something good was coming together.
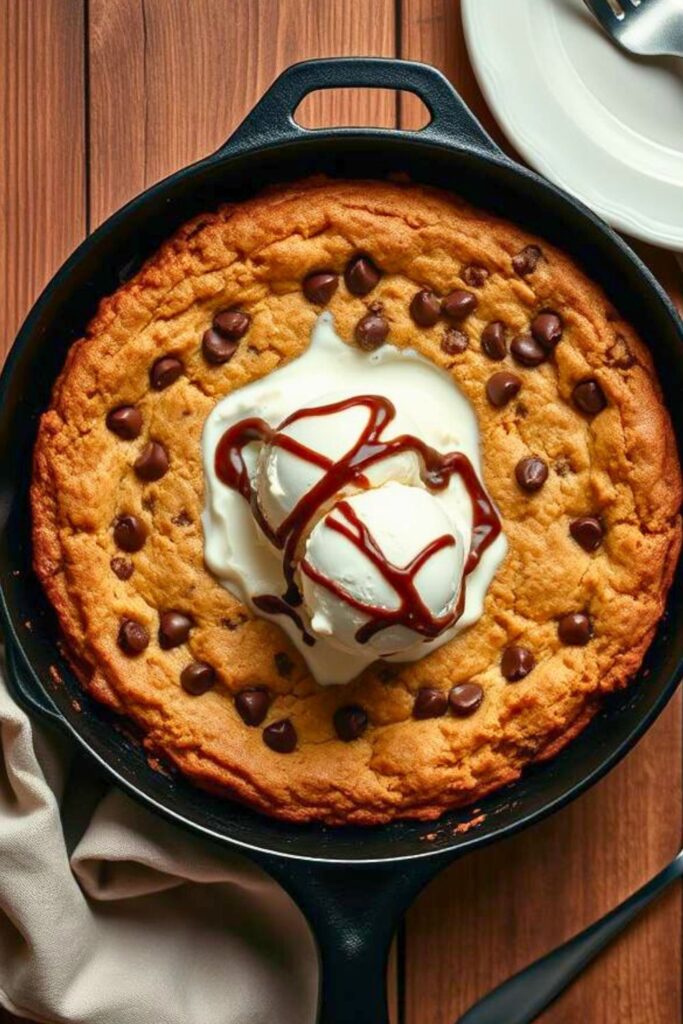
As it baked, the kitchen filled with that buttery, brown sugar smell, sweet, familiar, a little bit like home. The edges turned golden and crisp, while the center stayed soft and just barely set, with melted chocolate pooling in every bite. It wasn’t fancy, but it hit the spot in every way.
This recipe is all about ease and comfort. I’ll guide you through it step by step, share a few simple tricks, and offer some ways to make it your own. Whether you serve it straight from the skillet or dress it up with ice cream, trust me, this one’s a keeper.
What Makes This Recipe Special
The beauty of a giant skillet cookie lies in its simplicity and forgiveness. Unlike delicate cookies that can overbake in seconds, this baby gives you room to breathe. The cast iron skillet creates even heat distribution that’s tough to mess up. The larger surface area means you’re less likely to have that dreaded burnt bottom, raw middle situation.
This recipe also scales beautifully. Got a crowd? Make it in a 12 inch skillet. Just the two of you? An 8 inch pan works perfectly. The technique stays the same, just adjust your timing slightly.
Essential Ingredients for Perfect Skillet Cookies
Here’s what you’ll need, listed in the order you’ll actually use them:
For the cookie base:
- 1/2 cup unsalted butter, melted (European style butter makes a difference here)
- 1/2 cup packed light brown sugar
- 1/4 cup granulated sugar
- 1 large egg, room temperature
- 1 teaspoon vanilla extract
- 1 cup all purpose flour
- 1/2 teaspoon baking soda
- 1/2 teaspoon salt
- 3/4 cup chocolate chips (save some for topping)
Smart swaps that actually work: Can’t do dairy? Coconut oil works beautifully instead of butter – just make sure it’s softened, not melted. For richer flavor, try brown butter. Cook your butter in a small saucepan until it turns golden and smells nutty, then let it cool slightly.
No brown sugar? You can substitute with granulated sugar, but you’ll lose some chewy texture and molasses depth. In a pinch, mix white sugar with a tablespoon of molasses.
For the flour, stick with all purpose. I’ve tried this with whole wheat, and while it’s not terrible, it gets dense. If you’re gluten free, a 1:1 baking flour substitute works, but add an extra tablespoon since GF flours absorb more moisture.
Choosing Your Chocolate Chips
This is where people get passionate, and rightfully so. Semi sweet chocolate chips are the classic choice, but dark chocolate chips bring more sophistication. Mini chips distribute more evenly, while chunks create gorgeous melty pockets.
Here’s a pro tip: chop up good chocolate bar instead of using chips. The irregular shapes create more interesting melty spots, and you control the size. Just don’t go too small – you want those chocolate moments to be noticeable.
Step by Step Magic
Getting Your Pan Ready
Preheat your oven to 350°F. This temperature is crucial – too hot and you’ll get burnt edges with raw center, too cool and it won’t set properly.
Grease your 10 inch cast iron skillet with butter or cooking spray. Don’t skip this step. Even seasoned cast iron can grab onto cookie dough, and nobody wants to chip their beautiful creation out of the pan.
Mixing Like a Pro
Start by melting your butter completely. You want it warm but not hot – if it’s too hot, it’ll start cooking your egg when you add it. Room temperature butter won’t work here because we need that melted texture to create the right consistency.
In a large bowl, whisk together your melted butter and both sugars. This is where that brown sugar magic happens – it’s gonna create chewy texture and deep flavor. Mix until it’s smooth and slightly glossy.
Beat in your egg and vanilla. The mixture might look weird at first, but keep whisking. You want everything well combined and smooth.
The Flour Situation
In a separate bowl, whisk together flour, baking soda, and salt. This ensures even distribution of the leavening agents. I’ve seen too many cookies with pockets of baking soda that taste like soap – not cute.
Fold the flour mixture into your wet ingredients. Here’s where technique matters: mix until just combined. Overmixing develops gluten, which means tough cookies. We want tender, not chewy like rubber band.
Fold in about 2/3 of your chocolate chips. Save the rest for pressing into the top – this creates those picture perfect chocolate spots that make people think you’re a baking genius.
The Skillet Technique
Spread your dough evenly in the prepared skillet. Don’t worry about making it perfectly smooth – rustic is the goal here. Press those reserved chocolate chips into the top, creating even distribution.
Here’s a trick that changed my skillet cookie game: tap the pan gently on the counter a few times. This settles the dough and eliminates air bubbles that could create uneven baking.
Timing is Everything
Bake for 18-22 minutes, depending on how you like your center. For gooey center, aim for 18 minutes. For more set but still soft, go for 22. The edges should be golden brown and pulling slightly away from the pan.
Don’t overbake. The center will look slightly underdone when you pull it out, but it’ll continue cooking in the hot pan. This is called carryover cooking, and it’s your friend.
The Science Behind the Sizzle
Why Cast Iron Works So Well
Cast iron retains and distributes heat more evenly than other materials. This means your cookie bakes consistently from edge to center, reducing the risk of burnt edges and raw middles. The material also adds subtle crispness to the bottom that’s absolutely divine.
The thermal mass of cast iron also means your cookie stays warm longer after baking. This extends that perfect eating window when everything’s still melty and wonderful.
The Chemistry of Brown Sugar
Brown sugar contains molasses, which is more than just flavor. The molasses creates chemical reaction that keeps cookies soft and chewy. It also caramelizes at lower temperature than white sugar, giving you those beautiful golden edges without burning.
The hygroscopic nature of brown sugar (it attracts moisture from the air) also means your cookie will stay softer longer. White sugar alone creates crispier results.
Understanding Carryover Cooking
When you remove your skillet from the oven, cooking doesn’t stop. The residual heat in the pan continues to cook the center while the edges set. This is why the center can look slightly underdone when you pull it out – it’s actually perfect.
This technique is crucial for achieving that ideal texture contrast between crispy edges and soft center.
Making It Beautiful & Delicious
Presentation That Wows
Let your skillet cookie cool for about 5 minutes before serving. This allows it to set slightly while still being warm and gooey. Dust with light sprinkle of flaky sea salt – the contrast between sweet and salty is incredible.
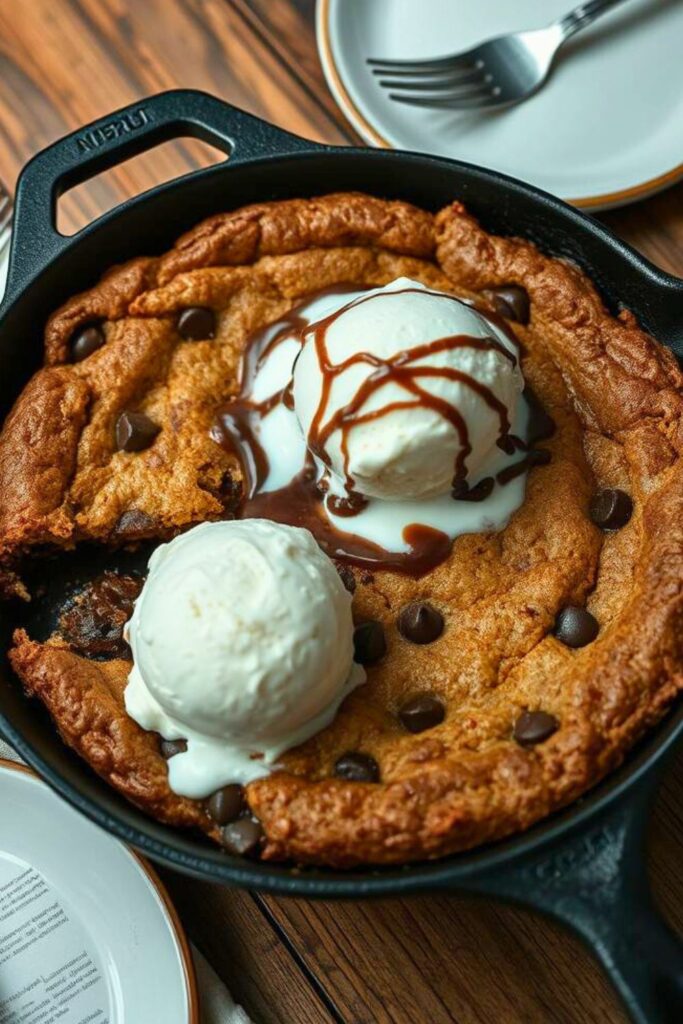
For photos (because let’s be real, you’re gonna want to share this), add a scoop of vanilla ice cream right in the center. The ice cream melting against the warm cookie creates this gorgeous, Instagram worthy moment.
Perfect Pairings
This chocolate chip skillet cookie is fantastic on its own, but it plays well with others. Cold milk is classic, but try it with:
- Vanilla ice cream (obviously)
- Salted caramel sauce drizzled over the top
- Fresh berries for a bit of tartness
- A cup of strong coffee for the adults
For entertaining, serve it family style with multiple spoons. There’s something communal about sharing a skillet cookie that brings people together.
Storage and Reheating
If you somehow have leftovers, cover the skillet with foil and store at room temperature for up to 2 days. To reheat, pop it in a 300°F oven for 5-7 minutes until warmed through.
You can also make the dough ahead and store it in the fridge for up to 3 days. Just press it into the skillet and bake when ready – add a couple extra minutes to the cooking time.
Variations to Try
Flavor Adventures
Once you’ve mastered the basic chocolate chip skillet cookie, the world is your oyster. Try these variations:
Peanut Butter Lovers: Replace half the chocolate chips with peanut butter chips and add a tablespoon of peanut butter to the dough.
S’mores Style: Add mini marshmallows and crushed graham crackers in the last 5 minutes of baking.
Nutty Goodness: Fold in toasted pecans or walnuts along with the chocolate chips.
Seasonal Spice: Add a teaspoon of cinnamon and pinch of nutmeg for cozy fall flavor.
Size Adjustments
For smaller skillet (8 inch), use 3/4 of the recipe and reduce baking time by 2-3 minutes. For larger skillet (12 inch), increase the recipe by half and add 3-4 minutes to the baking time.
Troubleshooting Common Issues
When Things Go Wrong
Burnt edges, raw center: Your oven’s probably running hot. Reduce temperature by 25°F and cover edges with foil if they’re browning too quickly.
Too dense: You likely overmixed the dough. Next time, fold just until ingredients combine.
Spreading too much: Your butter might’ve been too hot when you mixed it, or your dough was too warm. Let it cool slightly before baking.
Not sweet enough: Brown sugar can vary in sweetness. Taste your dough (it’s safe with pasteurized eggs) and adjust accordingly.
This chocolate chip skillet cookie recipe is forgiving enough for beginners but sophisticated enough to impress experienced bakers. The key is understanding that imperfection is part of its charm – those rustic edges and varying chocolate distribution make each bite different.
The best part? You’ll have this gorgeous, shareable dessert ready in under 30 minutes. It’s comfort food that doesn’t require a whole day in the kitchen, and sometimes that’s exactly what we need.
Frequently Asked Questions
Can I make this without a cast iron skillet?
You can use 9 inch cake pan or pie dish in a pinch, but you’ll lose some of that crispy bottom magic that cast iron provides. If using glass or ceramic, reduce the oven temperature by 25°F and watch the edges carefully.
How do I know when it’s perfectly done?
The edges should be golden brown and pulling slightly away from the pan. The center will look slightly underdone but shouldn’t jiggle when you gently shake the pan. Remember, it continues cooking in the hot skillet after you remove it.
Can I double this recipe?
Absolutely! Use 12 inch skillet and increase baking time by 5-7 minutes. You can also make two separate skillets if you’re feeding a crowd – they bake at the same time and look impressive side by side.
What’s the best way to serve this for a party?
Serve it warm directly from the skillet with multiple spoons and small bowls for individual portions. Set out vanilla ice cream and maybe some caramel sauce so people can customize their servings.
My dough seems too thick to spread. Is that normal?
The dough will be thicker than regular cookie dough – that’s perfect! Just press it evenly into the pan with your hands or the back of a spoon. Don’t worry about making it perfectly smooth; rustic is the goal here.