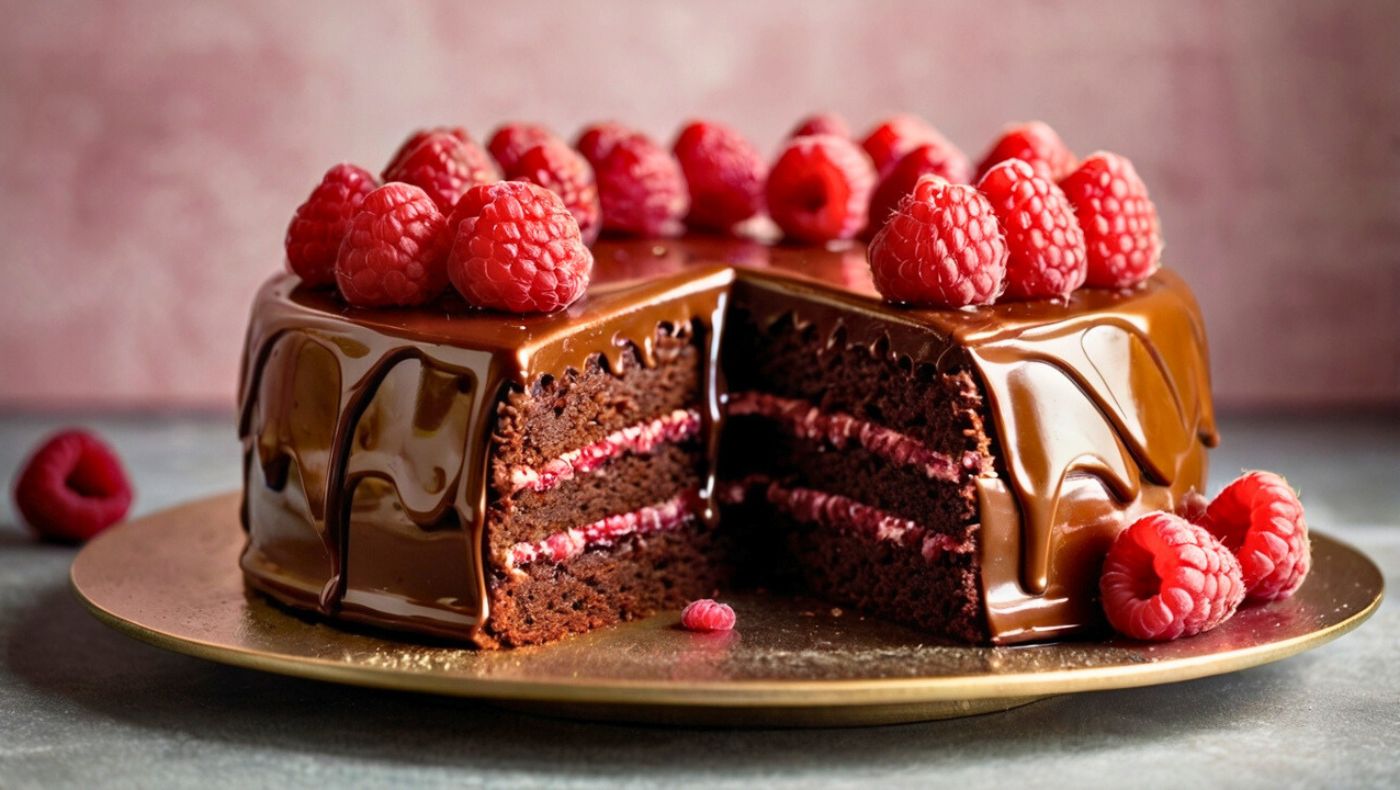
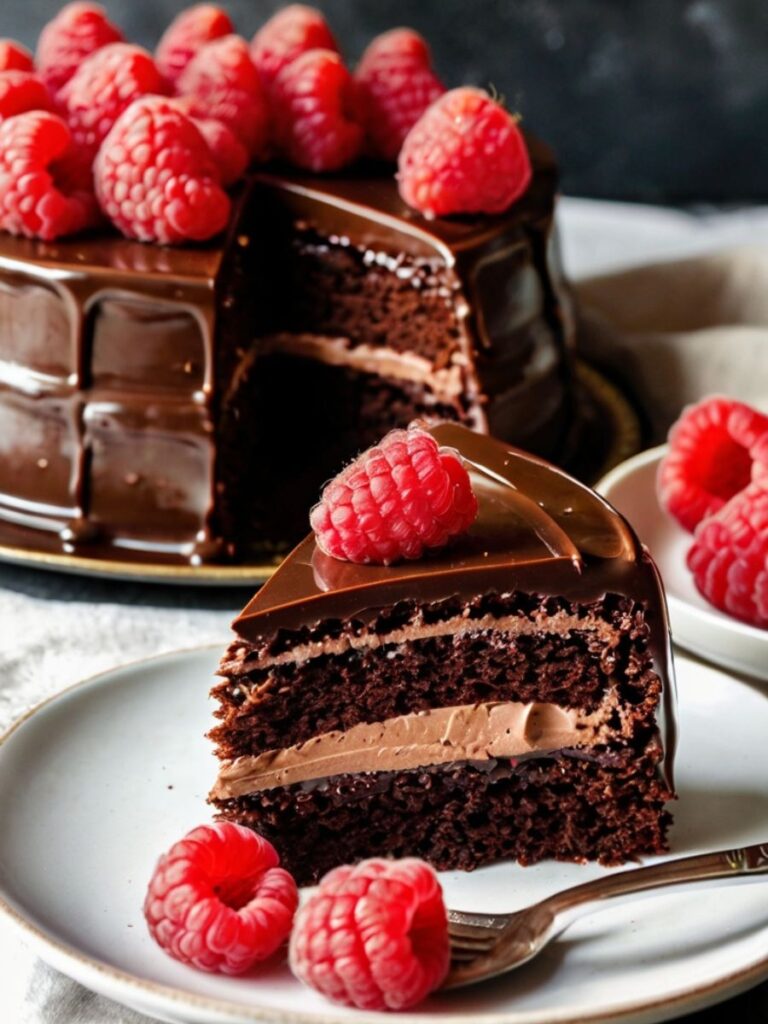
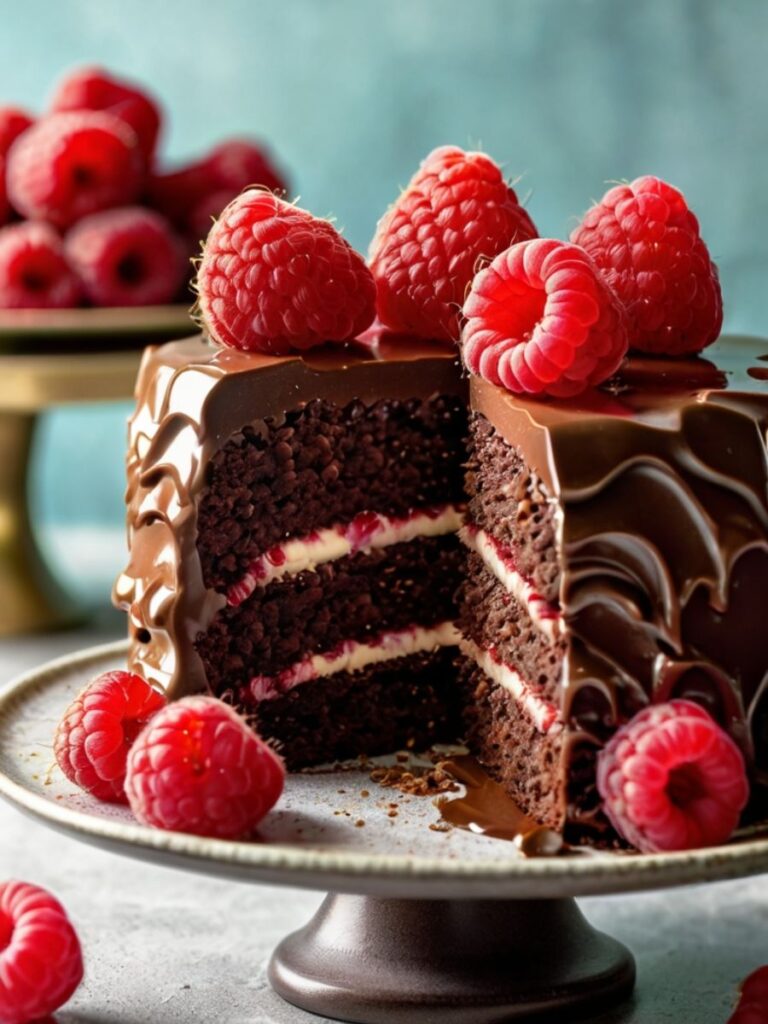
Chocolate Raspberry Cake Delight is a dessert that turns heads and melts hearts. It has rich chocolate layers and tangy raspberry filling. Every bite is rich with cocoa and fruit.
I first made this Chocolate Raspberry Cake Delight on a quiet, rainy Sunday. The kitchen filled with the cozy scent of berries and chocolate. One slice in, my family went silent then asked for more. That’s when I knew it was a keeper.
Since then, it’s become my go to for birthdays, holidays, or any day I want to impress. It looks like a bakery treat, but it’s easy to make at home.
In this post, you’ll learn how to bake soft chocolate sponges, whip up a bright raspberry filling, and finish with a smooth ganache or creamy frosting. No fancy tools needed. Just a few quality ingredients and a love for bold flavors.
So what makes this cake special? It’s not just pretty. It uses real berries no artificial flavor. The balance of chocolate and raspberry creates bold taste and rich texture in every slice.
This Chocolate Raspberry Cake Delight is more than a dessert. It’s a showstopper you can make in your own kitchen. Let’s get baking.
Ingredients & Substitutions
For the Chocolate Cake Layers:
- 2 cups all purpose flour (250g)
- 1¾ cups granulated sugar (350g)
- ¾ cup premium cocoa powder (75g), Dutch processed preferred
- 2 teaspoons baking soda
- 1 teaspoon baking powder
- 1 teaspoon salt
- 2 large eggs, room temperature
- 1 cup buttermilk (240ml)
- ½ cup vegetable oil (120ml)
- 2 teaspoons pure vanilla extract
- 1 cup hot coffee or boiling water (240ml)
The difference between natural and Dutch processed cocoa isn’t just marketing it’s chemistry. Dutch processed cocoa has been alkalized, making it less acidic and darker in color, which gives your cake that professional deep chocolate look. If you’ve only got natural cocoa, add ¼ teaspoon of baking soda to compensate for the acidity difference.
Can’t do dairy? Swap buttermilk with almond or oat milk plus 1 tablespoon of vinegar to mimic that acidity. For egg allergies, ½ cup of unsweetened applesauce per egg works surprisingly well here, though you’ll lose a bit of structure.
Coffee might seem strange in a chocolate cake, but trust me, you won’t taste coffee in the final product. It simply enhances the chocolate flavor by activating those complex compounds. If coffee’s not your thing, hot water will work, but add a teaspoon of espresso powder if you can.
For the Raspberry Filling:
- 3 cups fresh raspberries (or 2 cups frozen, thawed and drained)
- ¾ cup granulated sugar (150g)
- 3 tablespoons cornstarch
- 2 tablespoons lemon juice
- Pinch of salt
Fresh raspberries will always give you the brightest flavor, but frozen ones work beautifully in a pinch, just make sure to thaw and drain them thoroughly to avoid excess moisture. The secret most professionals won’t tell you: add a drop of rose water (literally just one drop) to enhance the raspberry’s floral notes.
If raspberries aren’t available, blackberries make an excellent substitute with a slightly earthier profile. Strawberries work too, but increase the lemon juice by a teaspoon to compensate for their natural sweetness.
For the Chocolate Ganache Frosting:
- 12 ounces high quality dark chocolate (60-70% cacao), chopped
- 1½ cups heavy cream
- 2 tablespoons unsalted butter, room temperature
- 1 teaspoon vanilla extract
- Pinch of salt
The quality of chocolate matters tremendously here this isn’t the place to skimp. A good 60-70% cacao percentage gives the perfect balance between sweetness and complexity. Too high (like 85%), and your frosting might taste bitter; too low, and it becomes cloyingly sweet.
For a dairy free alternative, full fat coconut milk works beautifully in place of heavy cream, though it will add a subtle coconut undertone. If you need a lighter option, whipped ganache uses the same ingredients but incorporates air for a less intense experience. Just let the ganache cool completely, then whip it with a mixer until light and fluffy.
Step by Step Instructions
Preparing the Chocolate Cake Layers
- Preheat your oven to 350°F (175°C) and prepare two 9-inch round cake pans by greasing them thoroughly and lining the bottoms with parchment paper. Don’t skip the parchment, it’s your insurance policy against a stuck cake disaster.
- In a large bowl, whisk together the flour, sugar, cocoa powder, baking soda, baking powder, and salt. Make sure to break up any cocoa lumps; those little pockets of undissolved cocoa can ruin an otherwise perfect cake texture.
- In a separate bowl, combine the eggs, buttermilk, oil, and vanilla extract, beating until well incorporated. The most common mistake bakers make here is using cold ingredients room temperature ingredients emulsify better, giving you a smoother batter.
- Gradually add the wet ingredients to the dry ingredients, mixing on medium speed until just combined. Overmixing activates gluten and leads to tough cake, so stop as soon as no dry streaks remain.
- Slowly pour in the hot coffee or water while mixing on low speed. The batter will seem thin don’t panic! This is exactly what creates that moist, tender crumb we’re after.
- Divide the batter evenly between the prepared pans and bake for 30-35 minutes, or until a toothpick inserted in the center comes out with just a few moist crumbs. The cake continues cooking slightly after removal, so avoid waiting until the toothpick is completely clean.
- Allow the cakes to cool in the pans for 15 minutes before transferring to wire racks to cool completely. If you’re in a hurry, you can pop the layers (still on the racks) into the freezer for 20 minutes to speed things up. This also makes them easier to handle during assembly.
Creating the Raspberry Filling
- In a medium saucepan, combine the raspberries, sugar, cornstarch, lemon juice, and salt. If using frozen berries, there’s no need to completely thaw them; they’ll break down during cooking.
- Cook over medium heat, stirring constantly and gently mashing some of the berries with your spoon. When the mixture starts to bubble, reduce heat to low and continue cooking for 5 minutes until thickened. You’ll know it’s ready when it coats the back of a spoon and a finger drawn through leaves a clear path.
- Transfer to a bowl and cover with plastic wrap, pressing it directly onto the surface to prevent a skin from forming. Chill completely in the refrigerator, at least 2 hours. Rushing this step will lead to a runny filling that escapes between your cake layers.
Making the Chocolate Ganache Frosting
- Place the chopped chocolate in a heat resistant bowl. Breaking or chopping your chocolate into uniform small pieces ensures it melts evenly. Those chocolate chip bags aren’t gonna cut it here.
- Heat the heavy cream in a saucepan just until it begins to simmer at the edges, tiny bubbles will appear, but don’t let it reach a rolling boil. Overheated cream can make your ganache grainy.
- Pour the hot cream over the chocolate and let it sit undisturbed for 3-5 minutes. This patience is crucial; premature stirring can cause the emulsion to break.
- Gently stir with a spatula from the center outward until the mixture becomes smooth and glossy. Add the butter, vanilla, and salt, continuing to stir until fully incorporated.
- Allow the ganache to cool at room temperature, stirring occasionally, until it reaches a spreadable consistency. This usually takes about 30-45 minutes, depending on your kitchen temperature. For a quicker set, you can place it in the refrigerator for 10-minute intervals, stirring between each.
Assembling the Cake
- Once the cake layers are completely cool, use a long serrated knife to level the tops if they’ve domed during baking. This ensures your cake will be stable and professional looking.
- Place the first layer on your serving plate or cake board. Pro tip: place three small strips of parchment paper under the edges of your cake to keep your serving plate clean during frosting.
- Pipe a “dam” of ganache around the edge of the cake layer using a piping bag fitted with a round tip. This creates a barrier that prevents the raspberry filling from seeping out.
- Spread the raspberry filling evenly within the ganache dam, leaving about ½ inch from the edge. Don’t overfill, or you’ll create structural problems about ¾ cup is perfect.
- Carefully place the second cake layer on top, pressing very gently to secure it. If your filling squeezes out excessively, you’ve used too much.
- Apply a thin “crumb coat” of ganache over the entire cake and chill for 20 minutes. This seals in any loose crumbs before the final frosting layer. If your kitchen’s warm, don’t skip this step. Room temperature ganache on a crumby cake is an exercise in frustration.
- Once the crumb coat has set, apply the remaining ganache generously over the top and sides of the cake. For a rustic look, create swirls with the back of a spoon; for a smoother finish, use a bench scraper or offset spatula warmed under hot water and dried before each pass.
- Decorate with fresh raspberries, chocolate shavings, or edible gold leaf if desired. For chocolate curls, use a vegetable peeler against a slightly warm chocolate bar.
Cooking Techniques & Science
The magic of a truly exceptional chocolate raspberry cake lies in understanding the science behind it. The acidic nature of buttermilk and coffee activates the baking soda, creating carbon dioxide bubbles that give your cake its tender crumb structure. Meanwhile, the fat from oil (rather than butter) coats the flour proteins, limiting gluten development and resulting in a more tender, moist cake that stays fresh longer.
Ever wondered why professional bakery cakes seem more stable? It’s because they understand the structural importance of temperature. Room temperature ingredients combine more uniformly, creating a stable emulsion. And that hot coffee trick? It blooms the cocoa powder, releasing more flavor compounds than you’d get by just mixing it with cold ingredients.
For the raspberry filling, the cornstarch undergoes gelatinization when heated with liquid; the starch granules absorb water, swell, and then burst, releasing amylose that creates a network to thicken your filling. The addition of acid from both raspberries and lemon juice helps maintain the berries’ vibrant color while balancing sweetness.
The ganache frosting relies on the principle that emulsion fats are suspended in water with the help of emulsifiers naturally present in chocolate. The key to silky smooth ganache is respecting the chocolate to cream ratio (2:1 by weight for frosting consistency) and controlling temperature during mixing. If your ganache “breaks” or becomes grainy, you can usually rescue it by whisking in a few teaspoons of warm cream.
One often overlooked technique is proper cake storage. Even the best chocolate raspberry cake will dry out if exposed to air. If not serving immediately, apply a thin layer of simple syrup (equal parts sugar and water, boiled then cooled) to each cake layer before adding filling. This professional trick locks in moisture without altering flavor.
Serving & Pairing Suggestions
A slice of chocolate raspberry cake deserves thoughtful presentation to maximize its visual and flavor impact. For an elegant plating, place a slice on its side rather than flat, drizzle the plate with raspberry coulis (pureed raspberries strained and mixed with a touch of powdered sugar), and finish with a quenelle of lightly sweetened whipped cream or a small scoop of vanilla bean ice cream.
The ideal serving temperature is just slightly below room temperature, about 30 minutes out of the refrigerator. This allows the ganache to soften slightly while maintaining structural integrity, and the flavors become more pronounced compared to serving it cold straight from the fridge.
When considering beverage pairings, avoid overly sweet options that might compete with the cake’s own sweetness. Instead, try:
- A medium bodied red wine with berry notes, like Pinot Noir
- Fresh espresso or a rich dark coffee
- Chamomile tea with a touch of honey
- A raspberry Lambic beer for the adventurous
- Milk (regular or plant based) for a classic, comforting combination
For complementary dishes when serving as part of a larger dessert spread, consider balancing the richness with fresh fruit options or lighter fare:
- Fresh berry medley with mint
- Citrus salad with honey drizzle
- Vanilla bean panna cotta
- Salted caramel ice cream (for those who want to double down on indulgence)
If serving for a special occasion, consider making mini versions using a cupcake tin or creating a deconstructed version with cake cubes, raspberry compote, and ganache cream arranged artistically on individual plates.
Final Thoughts: Chocolate Raspberry Cake Delight
Creating a truly memorable chocolate raspberry cake is both an art and a science, balancing flavors, textures, and techniques to achieve something greater than the sum of its parts. The rich depths of chocolate cake complemented by the bright acidity of fresh raspberries create a dessert that refuses to be forgotten.
The key takeaways for mastering this chocolate raspberry cake recipe are understanding ingredient interactions, respecting the importance of temperature at every stage, and embracing the balance between precision and intuition that defines great baking. Don’t be discouraged if your first homemade chocolate raspberry cake isn’t perfect; each bake teaches you something valuable for next time.
Remember that small details make big differences in your raspberry chocolate cake using coffee to enhance chocolate flavor, creating a ganache dam to contain raspberry filling, and allowing ingredients to reach proper temperatures aren’t just chef’s quirks but fundamental techniques that elevate your results.
The chocolate ganache frosting provides that professional finish while the sweet tart raspberry filling creates that perfect flavor balance that makes this cake so special. Every element works together to create a harmonious dessert experience.
Whether you’re baking this chocolate raspberry layer cake for a special celebration or simply because Tuesday needs a bit more joy, this decadent dessert delivers an experience that lingers in memory long after the last crumb disappears. And isn’t that what truly exceptional chocolate raspberry cakes are meant to do?
Frequently Asked Questions
Can I make this cake ahead of time?
Absolutely! The cake layers can be baked up to 3 days in advance, wrapped tightly in plastic wrap and refrigerated. The raspberry filling can be made up to 5 days ahead. For best results, assemble the day before serving to allow flavors to meld overnight in the refrigerator.
Why did my ganache frosting become grainy?
Grainy ganache usually happens when chocolate is shocked by heat or cold. To fix it, gently warm the mixture over a double boiler while whisking constantly, or add 1–2 teaspoons of warm cream and whisk until smooth again.
Can I substitute frozen raspberries for fresh in the filling?
Yes, frozen raspberries work great in the filling! No need to completely thaw them—just add them directly to the saucepan. You might need to cook the filling slightly longer to evaporate the extra moisture.
How do I prevent my cake layers from doming too much?
Wrap wet cake strips around your pans before baking (you can make these by soaking strips of towel in water and wrapping them in foil), or reduce your oven temperature by 25°F and bake slightly longer. Both methods slow the outside cooking so the cake rises more evenly.
What’s the best way to store leftovers?
Store covered at room temperature for up to 2 days, or refrigerate for up to 5 days. Let refrigerated slices sit at room temperature for 20–30 minutes before serving for best flavor and texture. Individual slices can also be frozen for up to 3 months, wrap in plastic then foil before freezing.

Swiftly Captions by Tina Smith — Quick, flavorful food recipes made simple, bringing fresh inspiration to your kitchen every day


