My alarm screams at 5:45 AM on a Tuesday. I’m not a morning person. Never have been. But last week I discovered something that changed everything. I rolled out of bed and made a Cozy Apple Kringle with Vanilla Glaze before my first Zoom meeting. My boss commented on the “amazing bakery delivery” she could smell through my video. I just smiled. She had no idea I’d made it myself in thirty minutes.
That’s when it hit me. Working women need recipes that look impossible but aren’t. We need food that impresses without demanding our already squeezed time. We need something that makes us feel like we’ve got our lives together, even when we absolutely don’t.
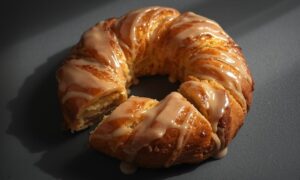
This kringle is that recipe. It’s flaky, gorgeous, and tastes like fall. The vanilla glaze drips down the sides like edible art. But here’s the real magic: you can make the dough Sunday night. Roll it Monday after dinner. Bake it Tuesday morning while answering emails. Your coworkers will think you’re superhuman. Your family will think you’ve been holding out on them. This Cozy Apple Kringle with Vanilla Glaze is your new secret weapon.
What Makes This Kringle Your New Best Friend
Traditional kringles come from Danish bakers in Wisconsin. They’d spend hours folding butter into dough. Creating hundreds of delicate layers. That’s beautiful. That’s also not happening in my Tuesday morning routine.
This version uses cream cheese dough. It’s a working woman’s dream. The cream cheese adds tenderness and forgiveness. You can’t really mess it up. Even if you’re half asleep and scrolling Instagram while mixing.
The apple filling uses three apple varieties. Granny Smith brings tartness. Honeycrisp adds sweetness. Braeburn creates complexity. Sounds fancy, but it takes the same time as using one type. The flavor difference though? Mind blowing.
That vanilla glaze has brown butter in it. Those nutty, caramelized notes elevate everything. It’s the difference between “nice” and “where have you been all my life?”
The whole thing bakes into an oval shape. It looks like you ordered it from a fancy bakery. Nobody needs to know it cost you four dollars and required almost no skill.
How This Fits Your Actual Life

I tested this recipe around my schedule. Between meetings. After the gym. On nights when I was exhausted. Even hungover once (we’ve all been there).
The dough comes together in ten minutes flat. Make it Sunday while meal prepping. Wrap it, chill it, forget it exists. Monday night, you roll and fill. Twenty minutes tops. Then bake Tuesday morning. Your coffee’s still brewing when you pull this masterpiece out.
Got a work potluck? This is your move. Everyone brings cookies. You bring a Cozy Apple Kringle with Vanilla Glaze. Suddenly you’re the office hero. Karen from Accounting can’t compete with this.
The recipe scales beautifully too. Make two at once. Freeze one before baking. Future you sends massive thank you vibes. Pop it straight from freezer to oven. Add five extra minutes. Done.
Ingredients for Your Cozy Apple Kringle with Vanilla Glaze
For the Cream Cheese Dough:
- 2 cups all purpose flour (spooned and leveled)
- 2 tablespoons granulated sugar
- ½ teaspoon salt
- ½ cup cold butter, cubed small
- 4 ounces cold cream cheese, cubed
- 2 tablespoons ice water (maybe more if needed)
For the Apple Filling:
- 2 cups mixed apples, peeled and diced fine
- 3 tablespoons brown sugar (light or dark)
- 1 tablespoon all purpose flour
- 1 teaspoon ground cinnamon
- ¼ teaspoon ground nutmeg
- Pinch of salt
- 1 tablespoon lemon juice
- 1 teaspoon vanilla extract
For the Brown Butter Vanilla Glaze:
- 3 tablespoons butter
- 1 cup powdered sugar
- 2 tablespoons milk (cream for richness)
- 1 teaspoon vanilla extract
- Tiny pinch of salt
Smart Swaps That Actually Work
Dairy Free Option: Replace butter with cold coconut oil. Use dairy free cream cheese like Kite Hill. For glaze, use plant butter and oat milk.
Gluten Free Version: Bob’s Red Mill 1 to 1 Flour works great. Add 1 teaspoon xanthan gum if yours doesn’t include it. The texture stays close. Maybe 85% as flaky. Still delicious.
Sugar Alternatives: Coconut sugar replaces brown sugar perfectly. For glaze, powdered monk fruit works. Just know it might crystallize slightly.
Apple Choices: Can’t find my recommended mix? Use what looks good. Avoid Red Delicious—they turn mushy. Gala, Fuji, or Pink Lady all work. Pick firm apples with some tartness.
No Cream Cheese? Mascarpone works in a pinch. Full fat Greek yogurt too. The dough will be slightly less tender. But you’ll still get flaky layers.
Picking the Right Apples
Walk into produce like you mean business. Squeeze those apples. They should feel rock solid. Any give means keep moving.
Look at the skin carefully. Bruises mean the flesh inside is breaking down. Those apples turn to mush when baked. You want unblemished fruit that holds its shape.
Slightly underripe apples work better here. They hold shape during baking. They don’t release excess liquid. That means your kringle stays flaky, not soggy.
Please peel them. Apple skins get leathery when baked into pastry. They ruin the texture completely. This isn’t the time for extra fiber.
Butter Quality Matters
I use European style butter for this. Higher fat content means more flavor. Better flakiness too. Kerrygold or Plugrá are worth the extra dollar.
Keep your butter properly cold. Just out of the fridge cold. Warm butter melts into dough instead of creating layers. You’ll end up with bread, not pastry.
Some people freeze butter and grate it. That works. But I find cubing it gives better control. Plus fewer dishes. I’m all about that.
Salted or unsalted? I use unsalted to control salt levels. If you only have salted, skip the salt in the dough.
Making Your Cozy Apple Kringle: Step by Step Magic
Creating the Dough (10 Minutes Max)
Grab a large bowl. Whisk together flour, sugar, and salt. This distributes everything evenly. Don’t skip it.
Add cold, cubed butter and cream cheese. Use a pastry cutter or two forks. Work the fats into flour until it looks like coarse crumbs. Some bigger pieces are perfect. Those create flaky layers.
Drizzle in ice water. Use a fork to bring it together. The dough will look shaggy. That’s exactly right. If it’s super dry, add water one teaspoon at a time.
Turn it onto your counter. Give it a few quick kneads. Just until it forms a cohesive ball. Maybe ten seconds of work. Flatten into a disc. Wrap tight. Refrigerate at least an hour. Or overnight. Or up to three days.
Common Mistake: People overwork this dough. They knead it like bread dough. That develops gluten. Your kringle gets tough. Treat it gently. Think folding laundry, not kneading bread.
Preparing the Filling (While Dough Chills)
Dice those apples small. About ¼-inch pieces work best. Uniform size means even cooking. Nobody wants crunchy chunks next to mushy ones.
Toss them with lemon juice first. This prevents browning. It also adds brightness that balances sweetness.
Mix in brown sugar, flour, cinnamon, nutmeg, and salt. The flour absorbs excess moisture. This prevents soggy pastry. It’s not optional.
Add vanilla extract last. Stir until apples are evenly coated. Set aside. The mixture will release juice. That’s normal.
Pro Tip: Make this filling the night before. The flavors meld beautifully. The apples macerate slightly. Everything tastes more intense.
Assembling Your Kringle (The Fun Part)

Preheat oven to 375°F. Line a baking sheet with parchment paper. This prevents sticking. Makes cleanup mindless too.
Pull out chilled dough. Let it sit five minutes. This makes rolling easier. Too cold and it cracks. Too warm and it’s sticky.
Flour your counter lightly. Roll dough into a rectangle. About 10 by 14 inches. Don’t obsess over perfection. Rustic looks homemade in the best way.
Start from center. Roll outward. Rotate dough as you go. This keeps thickness even. If it sticks, add tiny bits more flour.
Drain excess liquid from apple filling. Use a slotted spoon. Transfer apples down the center of dough. Leave 2 inches on each side and ends.
Fold one long side over the filling. Then the other side, overlapping. Press gently to seal. Fold up ends like wrapping a present. Pinch all seams closed.
Flip the whole thing seam side down onto baking sheet. Curve it into an oval. This is traditional kringle shape. But honestly? It can stay straight.
Troubleshooting: Dough tearing? Patch it with scraps. Press firmly. Brush with water if needed. The glaze hides all sins later.
Baking to Golden Perfection
Brush the top with milk or beaten egg. This creates gorgeous golden finish. It’s the difference between homemade and homemade.
Bake for 25 to 30 minutes. You’re watching for deep golden color. The edges should look slightly darker. That’s caramelization happening.
Your kitchen will smell insane. Like a bakery and autumn had a baby. Warn your family. They’ll appear like moths to flame.
The kringle is done when it sounds hollow. Tap it gently. The bottom should be golden too. If the top browns too fast, tent with foil.
Let it cool on pan for ten minutes. This lets filling set. Cut it too soon and filling runs everywhere. I’ve learned this the hard way.
The Science Behind the Flakiness
When cold butter hits hot oven, it creates steam. That steam pushes dough layers apart. You get flaky, crispy sheets we all love.
Cream cheese does something clever. It adds tanginess, sure. But it also interferes with gluten development. Less gluten means more tender pastry. That’s why this dough forgives mistakes.
The flour in filling isn’t just thickening. It’s absorbing moisture that would make the bottom soggy. Without it, you’d have wet, sad pastry. With it, everything stays crisp.
Brown butter in glaze is about the Maillard reaction. Butter solids caramelize when heated. New flavor compounds form. You get nutty, complex taste that regular butter can’t provide.
Making the Brown Butter Vanilla Glaze
This glaze is stupid simple but tastes expensive. Put butter in a light colored pan. Medium heat. Watch closely.
The butter will melt, foam, then foam subsides. Keep going. Swirl the pan occasionally. The milk solids start browning. They’ll smell nutty and amazing.
When it turns golden amber, kill the heat. Pour into mixing bowl immediately. It’ll keep cooking in pan otherwise. Then you’ve got burned butter. That’s bitter, not nutty.
Let it cool five minutes. Whisk in powdered sugar gradually. Add milk until it reaches drizzling consistency. Stir in vanilla and salt.
The salt is crucial here. It balances sweetness. Without it, glaze tastes one dimensional. With it, it tastes professional.
Drizzle this over slightly warm kringle. Don’t wait until it’s completely cool. The warmth helps glaze soak in slightly. It should drip down sides artistically.
Variation: Add a tablespoon of bourbon to glaze. Or maple syrup instead of some milk. Both are phenomenal.
Presenting Your Masterpiece
Transfer your glazed kringle to a serving board. Or a pretty plate. Honestly, serve straight from the pan. We’re not fancy here.
Slice into thick pieces. About 1½ inches wide. Use a serrated knife. A sawing motion works better than pressing down.
Dust with powdered sugar if you’re feeling extra. Scatter toasted pecans on top. Fresh apple slices alongside look gorgeous.
For photos: natural light is your friend. Shoot near a window. Get close to see those flaky layers. Show a piece pulled away with filling visible.
What to Serve Alongside
This kringle shines at breakfast or brunch. Put out good coffee. Something with caramel notes complements apples beautifully.
Hot spiced cider is obvious but perfect. The cinnamon echoes what’s in the pastry.
For full brunch spread, add scrambled eggs and crispy bacon. The savory elements balance the sweet. Add simple fruit salad for freshness.
Dessert setting? Serve slightly warm with vanilla ice cream. The cold hot contrast is everything. A little salted caramel sauce wouldn’t hurt.
Wine people: a semi dry Riesling works beautifully. So does Moscato d’Asti. The slight sweetness and acidity cut through richness.
Storing and Make Ahead Magic
This kringle keeps at room temperature two days. Just cover it loosely. The glaze stays put. The pastry stays reasonably crisp.
Refrigerated, it lasts four days. Bring slices to room temperature before serving. Or warm them ten seconds in microwave.
Freezing the baked kringle works great. Freeze before glazing. Wrap tightly in plastic, then foil. It keeps three months. Thaw overnight, warm slightly, then glaze.
Better yet, freeze the assembled, unbaked kringle. Wrap it well. When you want it, bake straight from frozen. Add five to eight extra minutes. Fresh pastry with zero morning effort.
The dough alone freezes beautifully too. Make a double batch. Freeze half. Having pastry dough ready is like a secret superpower.
Variations to Keep Things Exciting
Cranberry Orange Version: Replace half the apples with fresh cranberries. Add orange zest to filling. Use orange juice in glaze instead of milk. Perfect for holidays.
Pear and Ginger: Use diced pears instead of apples. Add crystallized ginger and ¼ teaspoon ground ginger. The spice is everything.
Caramel Apple: Toss apples with caramel bits before filling. Drizzle extra caramel over glaze. It’s indulgent and wonderful.
Nutty Addition: Spread ¼ cup almond paste under apple filling. Sprinkle toasted pecans on top. The nuts add texture and richness.
Summer Berry: When apples aren’t in season, use mixed berries. Add cornstarch instead of flour for berry juice. Lemon zest in filling brightens everything.
Troubleshooting Common Issues

Dough too crumbly? Add water one teaspoon at a time. Sometimes humidity affects flour. You need enough moisture for it to hold together.
Filling leaking out? You didn’t seal edges well enough. Next time, use water to help them stick. Press more firmly. Crimp with a fork if needed.
Bottom getting soggy? Your filling had too much liquid. Always drain excess juice before filling. Also, make sure oven is fully preheated.
Top browning too fast? Your oven runs hot. Reduce temperature by 25°F next time. Tent with foil if needed during baking.
Glaze too thick? Add more milk. One teaspoon at a time. It should drizzle, not plop.
Glaze too thin? Add more powdered sugar. Or let it sit. It thickens as it cools.
Why This Cozy Apple Kringle with Vanilla Glaze Deserves Your Time
I could grab store bought apple turnovers. They’re fine. They exist. But they don’t impress my boss on Zoom. They don’t make my kids request them by name.
This recipe hits different. It’s got that homemade magic. The kind that makes people feel cared for. It says “I’m capable and you matter.”
But here’s the real secret. It’s not actually that much time. Active time is maybe thirty minutes. The rest is oven doing its thing. You can make this and still binge watch Netflix.
The skills you learn transfer too. This dough technique works for other pastries. The filling principles apply to pies and tarts. You’re not just making one recipe. You’re leveling up your whole baking game.
There’s something deeply satisfying about pulling golden, flaky pastry from your own oven. It’s everyday magic. In our crazy, rushed world, we need more of that.
Make this on meal prep Sunday. Make it for your work potluck. Make it because Tuesday needs something special. Whatever your reason, you won’t regret it. This Cozy Apple Kringle with Vanilla Glaze becomes your signature move. Your secret weapon. Your proof that working women can absolutely have it all—including fresh pastry before 8 AM meetings.
Frequently Asked Questions About Apple Kringle with Vanilla Glaze
Can I make this kringle without a rolling pin?
Absolutely! You can use a wine bottle, a sturdy glass, or even a smooth drinking glass as a substitute. Just make sure whatever you choose is clean and dry. Lightly flour the surface and the tool you’re using. Then roll from the center outward, the same way you would with a regular rolling pin. I’ve made dozens of pastries this way, especially in small kitchens, and it works beautifully every single time.
How do I know when the kringle is done?
Trust your eyes first. The pastry should be deep golden brown. Not pale beige, truly golden. Tap the top gently. It should sound hollow, not dense. Lift it slightly with a spatula. Check the bottom. It should be golden too. If still unsure, instant read thermometer should read 190°F in the thickest part.
My cream cheese is rock hard. Now what?
Let it sit on counter five minutes. Just enough to take the hard edge off. You can cut it into smaller pieces first. Or use a box grater to shred it into flour. That actually works brilliantly. Tiny shreds incorporate faster than cubes. Just don’t let it get warm and soft.
Can I use canned apple pie filling?
Technically yes, but I’ll be honest. It won’t taste as good. Canned filling is too sweet and thick. The texture is mushy. You lose fresh apple brightness. If you’re really in a pinch, drain filling well. Add cinnamon and lemon juice to brighten it. But fresh apples take ten minutes to prep. That’s worth it for flavor difference.
Why did my glaze harden into thick coating?
Your glaze was probably too thick initially. Or you let kringle cool completely before glazing. Glaze sets harder on cold pastry. Next time, add an extra tablespoon of milk. Apply it while kringle is still slightly warm. If it already happened, no worries. It still tastes great. Just call it “rustic frosting” and move on.

Swiftly Captions by Tina Smith — Quick, flavorful food recipes made simple, bringing fresh inspiration to your kitchen every day