Easy Italian Stromboli, it wasn’t planned. But it turned into something unforgettable. You know that kind of evening late, cold, and you’re standing in the kitchen staring into the fridge like it might magically fix your dinner dilemma. Everyone’s hungry, you’re exhausted, and another round of plain sandwiches just won’t cut it. You want comfort. You want flavor. But you also need easy and doable with what’s already in the kitchen.
That’s exactly where I found myself one weeknight, no plan, no groceries, and a serious craving for something hearty. I spotted a half used roll of pizza dough, some deli meats, and the last bit of shredded cheese tucked behind a jar of pickles. And suddenly, the idea hit: Italian Stromboli. I didn’t follow a recipe, I followed instinct, hunger, and the smell of something nostalgic waiting to happen.
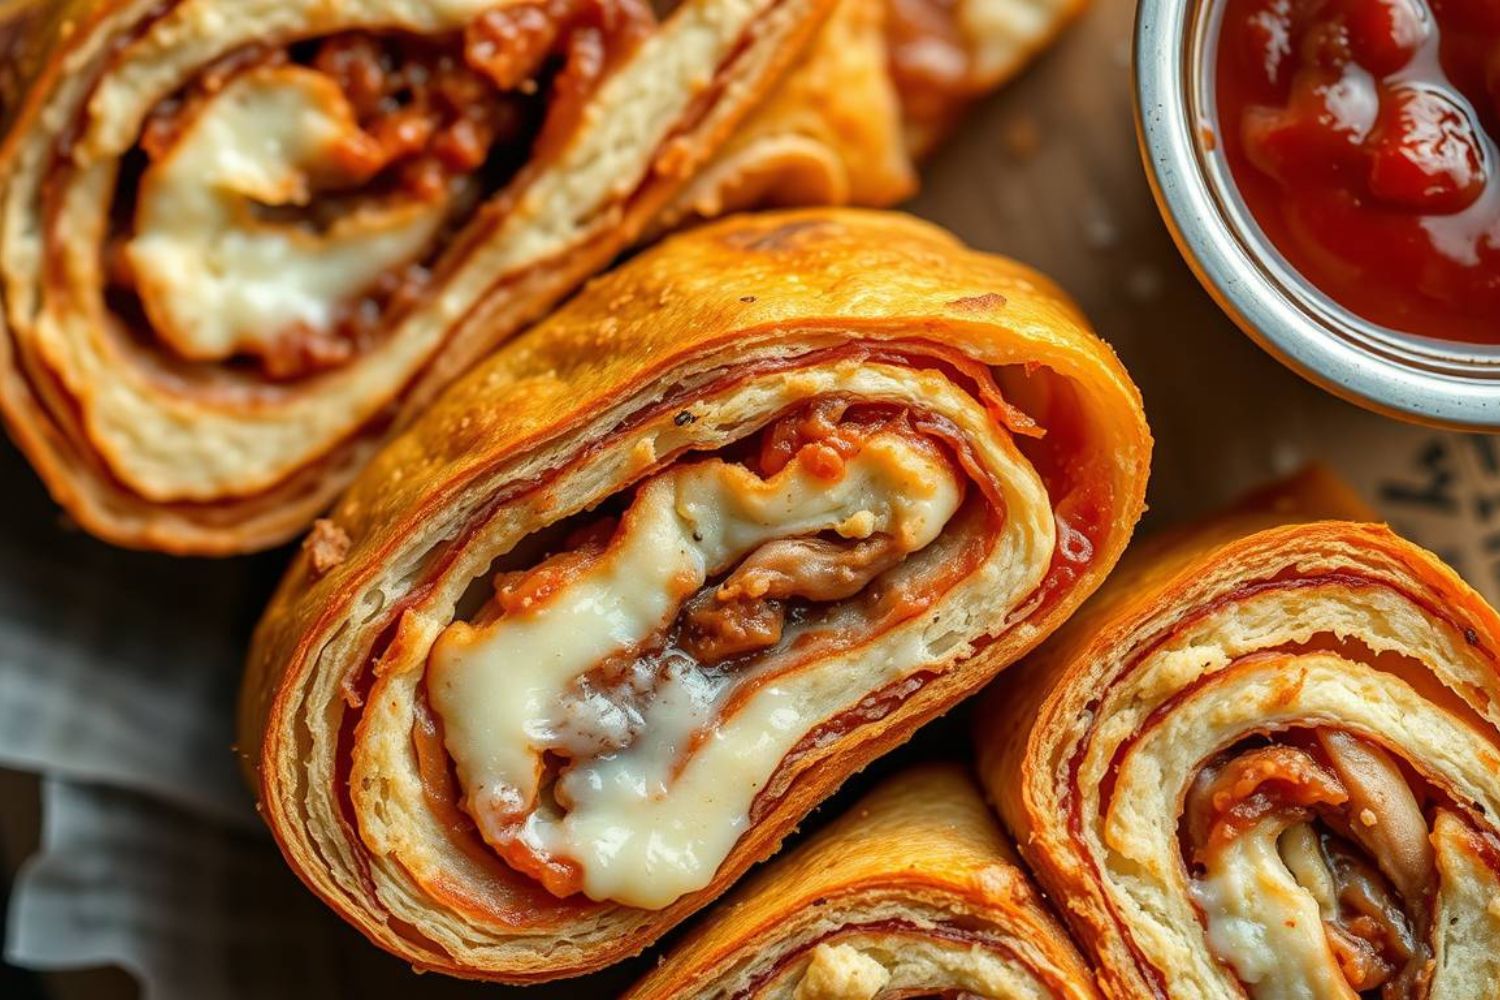
The kitchen filled with the aroma of sizzling garlic, spiced meats, and melting cheese as I rolled up layers of salami, ham, and mozzarella into that soft, stretchy dough. A brush of olive oil, a sprinkle of herbs, and into the oven it went. What came out was golden, crisp on the outside, and gooey and savory on the inside each slice oozing cheese and packed with bold Italian Stromboli flavor.
This Italian Stromboli has become a go to in my kitchen not just because it’s easy, but because it feels like a treat even on the toughest days. It’s flexible, crowd pleasing, and honestly? Way better than anything you could order in. Keep reading for step by step tips, filling ideas, and the little tricks that make it perfect every time. Once you try it, you’ll see why this wasn’t just dinner, it was a discovery.
What Makes Stromboli Absolutely Magical
Real Italian Stromboli isn’t just rolled pizza dough stuffed with random ingredients. It’s a carefully crafted pocket of joy that Italian American communities in Philadelphia created in the 1950s. They named it after the volcanic island of Stromboli (because flavors explode in your mouth when you bite it), making this dish pure comfort food poetry.
The secret? Master the dough to filling ratio and seal those edges perfectly. Get it right, and you’ll create crispy, golden perfection that locks beautiful flavors inside until that first magical bite.
Here’s what sets authentic stromboli apart from calzone: calzones fold over like a half moon, but stromboli rolls up like a delicious burrito. This creates completely different flavor and texture layers that’ll make you wonder why you settled for anything less.
Ingredients That’ll Change Your Life

Here’s what you’re gonna need, in the exact order I grab them from my pantry:
For the Dough:
- 3 cups bread flour (trust me, all purpose works, but bread flour gives perfect chew)
- 1 packet active dry yeast
- 1 teaspoon sugar
- 1 cup warm water (about 110°F, should feel like comfortable bath water)
- 2 tablespoons olive oil
- 1 teaspoon salt
For the Filling:
- 6 oz thinly sliced salami (get deli counter quality, pre packaged doesn’t cut it)
- 6 oz sliced pepperoni
- 4 oz sliced ham
- 8 oz whole milk mozzarella, sliced thick
- 4 oz provolone cheese, sliced
- 1/2 cup ricotta cheese
- 1/4 cup grated Parmesan
- 1 small bell pepper, sliced thin
- 1/2 medium onion, sliced thin
- 2 cloves garlic, minced
- 1 tablespoon Italian seasoning
- 1 egg, beaten (for gorgeous golden wash)
Smart Swaps for Every Kitchen
Can’t find salami? Prosciutto works beautifully, or quality turkey if you’re keeping it lighter. Choose meats that aren’t too wet, or they’ll make your dough soggy.
Lactose bothering you? I’ve had amazing results with cashew based mozzarella alternatives. Make sure they melt well, some harder vegan cheeses don’t give you that stretchy, gooey center we want.
Living somewhere without great Italian delis? Here’s a secret: freezer sections often stock better quality meats than regular deli cases. Look for brands like Boar’s Head or Applegate they’re worth the extra cost.
Fresh out of bread flour? Mix 3 cups all purpose with 2 tablespoons vital wheat gluten. It’s not identical, but it’ll get you close to perfect texture.
Easy Italian Stromboli: The Step by Step Magic

Getting Your Dough Perfect
Start by dissolving that yeast in warm water with the sugar. Give it about 5 minutes it should foam up like a cappuccino. If it doesn’t, your yeast might be dead, and trust me, you don’t want to find that out after you’ve already made the dough.
Mix your flour and salt in a large bowl. Make a well in the center (just like nonna used to do) and pour in your foamy yeast mixture along with the olive oil.
Here’s where most people mess up: they either overwork the dough or give up too early. You want to knead this baby for about 8-10 minutes until it’s smooth and elastic. It should bounce back when you poke it gently.
Let it rise in an oiled bowl for about an hour. I like to put mine in a slightly warm oven (just turn it on for a minute, then turn it off), creates the perfect environment.
Rolling and Filling Like a Pro
Once your dough has doubled, punch it down gently and roll it into a rectangle about 12×16 inches. Don’t worry about making it perfect rustic is beautiful.
Now comes the fun part. Spread that ricotta like you’re painting a canvas, leaving about an inch border all around. Sprinkle on the Parmesan, then layer your meats and cheeses. I like to alternate them salami, mozzarella, pepperoni, provolone, you get the idea.
Add your veggies on top. Here’s a trick Sofia taught me: sauté those peppers and onions for just 2-3 minutes first. Takes out some of the moisture so they don’t make your stromboli soggy.
Sprinkle everything with Italian seasoning and a crack of black pepper.
The Rolling Technique That Changes Everything
This is where the magic happens. Starting from the long side, roll the dough tightly but gently. Think of it like you’re rolling up a sleeping bag firm but not aggressive.
Pinch the seam closed and place it seam side down on a parchment lined baking sheet. Pinch the ends closed too, then fold them under slightly. This creates a perfect seal that won’t burst open in the oven.
Brush the whole thing with beaten egg. This gives you that gorgeous golden color that makes people think you’re some kind of culinary wizard.
Make 3-4 diagonal slashes on top with a sharp knife. This isn’t just for looks, it lets steam escape so your stromboli doesn’t explode like Mount Vesuvius.
Easy Italian Stromboli: The Science Behind the Sizzle
Bake at 375°F for about 35-40 minutes until it’s golden brown and sounds hollow when you tap it. The internal temperature should hit 165°F if you want to be precise about it.
Here’s what’s happening inside that oven: the egg wash is creating a barrier that keeps moisture in while browning the outside. Those slashes are allowing just enough steam to escape without drying everything out. The bread flour is creating gluten networks that give you that perfect chewy texture.
The cheese is melting and binding everything together while the meats are releasing their flavors into the dough. It’s like a beautiful symphony where every ingredient plays its part.
Temperature control is crucial here. Too hot, and the outside burns before the inside is cooked. Too cool, and you’ll get a pale, doughy mess. 375°F is that sweet spot where everything comes together perfectly.
Avoiding the Common Pitfalls
Don’t overfill it, I know it’s tempting, but too much filling will make it impossible to seal properly. You want generous layers, not a bursting suitcase.
Let it rest for 10 minutes after you roll it but before you bake it. This helps the dough relax and makes it less likely to spring back.
If your dough keeps shrinking back while you’re rolling, it means the gluten is too tight. Let it rest for 10-15 minutes and try again.
Making It Beautiful and Delicious
Let your Italian Stromboli rest for at least 10 minutes before slicing. This keeps all those beautiful melted cheeses from oozing out everywhere.
Slice it with a sharp serrated knife in a gentle sawing motion. Clean cuts show off those gorgeous layers inside.
For presentation, arrange the Italian Stromboli slices on a wooden board with a small bowl of marinara sauce for dipping. Add some fresh basil leaves and a drizzle of good olive oil.
This pairs beautifully with a simple arugula salad dressed with lemon and olive oil. The peppery greens cut through the richness perfectly. For wine, try a Chianti Classico or even a crisp Pinot Grigio.
Variations That’ll Keep You Excited
Feeling adventurous? Try a “Philly Cheesesteak” version with thinly sliced steak, peppers, onions, and provolone. Or go vegetarian with roasted vegetables, fresh mozzarella, and pesto.
For breakfast lovers, fill it with scrambled eggs, bacon, and cheese. Trust me on this one, it’s incredible.
Want something lighter? Use grilled chicken, fresh mozzarella, tomatoes, and basil for a Caprese style stromboli that’s absolutely divine.
The Final Word on Easy Stromboli Perfection
Making authentic Italian Stromboli isn’t just about following a recipe; it’s about understanding the balance between dough, filling, and technique. When you get it right, you’ll have something that’s crispy on the outside, tender on the inside, and packed with flavors that’ll make your kitchen smell like the best Italian restaurant in town.
The beauty of Italian Stromboli is that once you master the basic technique, you can make it your own. Experiment with different meats, cheeses, and vegetables. Try different seasonings. Make it as simple or as complex as your mood demands.
Remember, the best stromboli comes from using quality ingredients and taking your time with each step. Don’t rush the dough, don’t overfill, and don’t skip that resting period before baking.
Most importantly, make it with love. Food tastes better when it’s made with care, and stromboli is no exception.
EASY ITALIAN STROMBOLI: FAQ
Can I make the dough ahead of time?
Absolutely! You can prepare the dough up to 2 days in advance and store it in the fridge, tightly covered. Just be sure to let it come to room temperature before rolling, so it’s easier to work with and rises properly. You can also freeze the dough for up to 3 months, just thaw it overnight in the fridge, then let it rest on the counter before using. This makes weeknight Italian Stromboli prep faster and stress free.
Why does my stromboli sometimes burst open?
Bursting usually happens because of overfilling or not sealing the dough edges well enough. Make sure you leave at least a one inch border, pinch all seams tightly, and fold the ends under to lock everything in. Don’t forget to slash vents on top to let steam escape. Also, letting your stromboli rest for 10 minutes before baking helps the gluten relax, making it less likely to tear or pop open while baking.
Can I freeze leftover stromboli?
Yes! Leftover Italian Stromboli freezes beautifully. Slice it first, then wrap each piece individually in plastic wrap or foil and place them in a freezer safe bag. They’ll keep well for up to 3 months. To reheat, use a 350°F oven for about 15 minutes, this helps keep the crust crisp and the inside gooey. Avoid microwaving, as it can make the crust rubbery and unevenly heated.
My stromboli is soggy inside. What went wrong?
A soggy stromboli usually means too much moisture got trapped inside. Wet ingredients like uncooked vegetables or overly moist cheese can be the culprits. Always sauté high moisture veggies like onions or bell peppers before adding them. Drain or pat dry cheeses if needed. Also, check your oven’s temperature, if it’s running cooler than it should, the stromboli won’t bake evenly, leaving the inside undercooked and damp.
Can I make individual mini strombolis?
Definitely! Mini strombolis are a fun twist and great for entertaining. Just divide your dough into 4–6 equal parts and fill each with your favorite ingredients. They bake faster, usually around 20–25 minutes, and are perfect for lunchboxes, appetizers, or when everyone wants their own custom combo. Mini versions are also easier to handle, especially for kids or parties where finger food is ideal.

Swiftly Captions by Tina Smith — Quick, flavorful food recipes made simple, bringing fresh inspiration to your kitchen every day


