Ever craved a candy bar so badly you wished you could make it at home fresh, rich, and extra satisfying? That’s exactly how I felt the day I first tried Homemade Twix Bars. One bite, and I knew I’d never go back to store bought. There’s something truly special about crafting these layers from scratch. The shortbread is buttery and crisp, the caramel is smooth and chewy, and the chocolate topping? It melts in your mouth. These Homemade Twix Bars don’t just taste amazing they’re fun to make and even better to share.
In this post, I’ll show you exactly how to make Homemade Twix Bars in your own kitchen. You’ll learn how to master each layer with simple, clear steps no fancy tools or tricky techniques needed. From baking the perfect shortbread base to creating silky caramel and getting that glossy chocolate finish, this recipe covers it all. Whether you’re new to baking or already a pro, these bars will become a go to favorite.
Want to impress guests at your next gathering? Or maybe just treat yourself to something that feels a little extra? These bars check every box sweet, satisfying, and made with love. Let’s turn that craving into a homemade masterpiece you’ll want to make again and again.
The Architecture of a Perfect Twix Bar
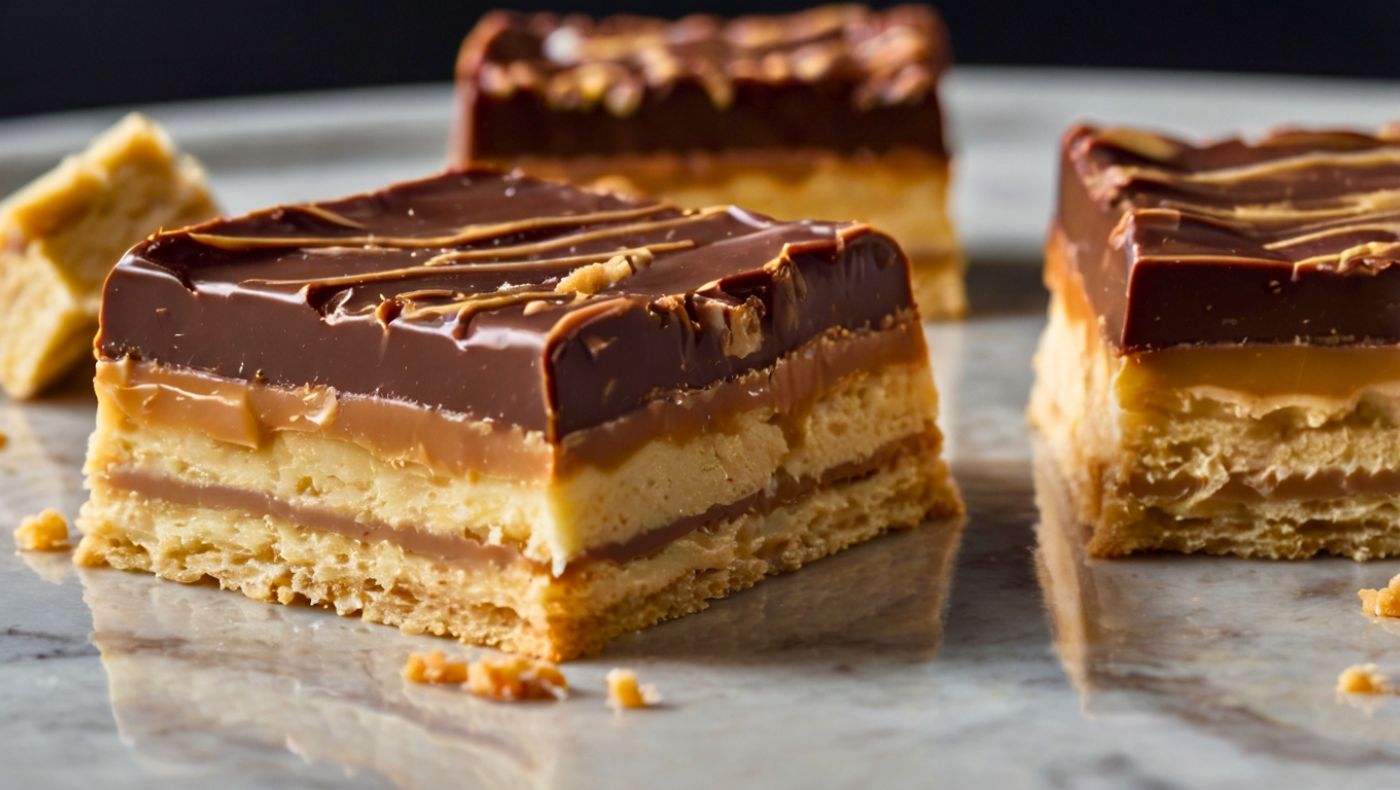
Each Twix bar represents a masterclass in textural contrast and flavor balance. The foundation a crisp, sandy shortbread provides structural integrity while contributing a buttery richness that complements the sweet caramel layer. This caramel must achieve the perfect consistency: firm enough to hold its shape when you bite it, yet soft enough to yield without breaking teeth. The chocolate exterior serves as both protection and flavor enhancer, its slight bitterness offsetting the sweetness within.
Understanding this architecture proves crucial for success. Each layer depends on the others, and timing becomes everything. You must cool the shortbread completely before applying caramel, heat the caramel to the precise temperature for proper setting, and temper the chocolate carefully to achieve that satisfying snap.
Ingredients & Substitutions
For the Shortbread Base:
- 2 cups all purpose flour (240g)
- 1/2 cup powdered sugar (60g)
- 1/2 teaspoon fine sea salt
- 1 cup unsalted European style butter, cold and cubed (226g)
- 2 tablespoons heavy cream
- 1 teaspoon vanilla extract
For the Caramel Layer:
- 1 cup granulated sugar (200g)
- 1/4 cup water
- 1/2 cup heavy cream, warmed
- 4 tablespoons unsalted butter
- 1 teaspoon vanilla extract
- 1/2 teaspoon flaky sea salt
For the Chocolate Coating:
- 12 ounces high quality dark chocolate (60-70% cacao), chopped
- 2 tablespoons coconut oil or cocoa butter
The quality of your butter makes a dramatic difference in the shortbread’s final texture. European style butter contains less water and more fat, creating a more tender, flaky base. If you can’t find it, regular unsalted butter works, but expect a slightly denser result.
For those with dietary restrictions, you can adapt the shortbread beautifully to gluten free flour blends just ensure your blend contains xanthan gum for proper binding. Vegan alternatives work too: substitute plant based butter and coconut cream, though the flavor profile will shift slightly toward the tropical side.
The caramel component demands precision more than substitution. You need granulated sugar here brown sugar introduces moisture that interferes with proper caramelization. However, you can experiment with the cream component: coconut cream creates a richer, more complex flavor, while adding a tablespoon of bourbon or rum transforms the entire candy bar’s personality.
Your chocolate selection dramatically impacts the final product. I prefer chocolate in the 60-70% range sweet enough to complement the caramel without overwhelming it, bitter enough to provide contrast. Milk chocolate creates a sweeter, more traditional result, while 80% dark chocolate appeals to those who prefer sophisticated, less cloying confections.
Step-by-Step Instructions for Making Homemade Twix Bars
Preparing the Shortbread Foundation
Begin by preheating your oven to 350°F (175°C) and lining a 9×9 inch pan with parchment paper, leaving overhang for easy removal. The parchment prevents sticking while allowing you to lift the entire batch out cleanly a crucial detail that saves countless headaches later.
Combine flour, powdered sugar, and salt in a large mixing bowl. The powdered sugar dissolves more easily than granulated, creating a finer crumb structure. Cut the cold butter into small cubes this ensures even distribution and prevents you from overworking the dough.
Using a pastry cutter or your fingertips, work the butter into the dry ingredients until the mixture resembles coarse breadcrumbs with some pea sized butter pieces remaining. These butter pieces create the flaky layers that make shortbread so irresistible. Add cream and vanilla, mixing just until the dough comes together overmixing develops gluten, resulting in tough cookies.
Press the dough evenly into your prepared pan using the bottom of a measuring cup for uniform thickness. Prick the surface all over with a fork to prevent puffing during baking. This step proves crucial unpierced shortbread can bubble and create an uneven surface for your caramel layer.
Bake for 20-25 minutes until the edges turn lightly golden and the center feels set when you gently press it. The shortbread should look pale golden, not deep brown overbaking creates a hard, crumbly base that won’t support the caramel properly.
Mastering the Caramel Layer
While the shortbread cools completely, prepare your caramel and I cannot stress enough how important it is to let that base cool entirely. Hot caramel on warm shortbread creates a soggy, compromised foundation that’ll ruin your entire project.
Combine sugar and water in a heavy bottomed saucepan, stirring just until the sugar dissolves. From this point forward, resist the urge to stir movement encourages crystallization, which turns smooth caramel into grainy sand. Instead, swirl the pan occasionally to ensure even heating.
Cook over medium high heat until the mixture reaches a deep amber color this takes 8-12 minutes depending on your stove. The color change happens quickly at the end, so watch carefully. You’re looking for a rich, copper penny hue that smells nutty and complex.
Remove from heat and immediately whisk in the warm cream it’ll bubble violently, so pour slowly and keep whisking. Add butter, vanilla, and salt, whisking until smooth. The caramel should coat the back of a spoon but still pour easily.
Pour the caramel over the cooled shortbread, spreading it evenly with an offset spatula. Work quickly but carefully caramel continues to thicken as it cools. Allow it to set at room temperature for at least 2 hours, or refrigerate for 1 hour until firm.
Tempering the Chocolate Coating
Proper chocolate tempering creates that professional snap and glossy finish that separates homemade confections from amateur attempts. While tempering seems intimidating, the seeding method makes it accessible for home cooks.
Chop your chocolate finely and place two thirds in a heatproof bowl. Melt this portion over a double boiler, stirring constantly until it reaches 115°F (46°C). Remove from heat and add the remaining chocolate gradually, stirring until the temperature drops to 84°F (29°C).
Return the bowl to the double boiler briefly, stirring until the temperature rises to 88°F (31°C). This final temperature proves crucial too hot and the chocolate won’t set properly, too cool and it’ll become thick and difficult to work with.
Test the temper by dipping a knife into the chocolate it should set within 3-5 minutes with a glossy finish. If it remains tacky or looks dull, you need to repeat the tempering process.
Cut the caramel topped shortbread into bars using a sharp knife you’ve dipped in warm water between cuts. Dip each bar in the tempered chocolate, allowing excess to drip off before placing on a parchment lined sheet. The chocolate should set within 10-15 minutes at room temperature.
Cooking Techniques & Science
The science behind each Twix component reveals why precision matters so much in confectionery work. Shortbread’s tender crumb comes from fat coating flour proteins, preventing gluten development. The cold butter creates steam pockets during baking, resulting in the characteristic flaky texture.
Caramel formation involves complex Maillard reactions and sugar pyrolysis the breakdown of sugar molecules into hundreds of flavor compounds. The amber color signals the development of these compounds, while the temperature determines final consistency. Too low and it won’t set; too high and it becomes hard candy.
Chocolate tempering aligns cocoa butter crystals into the most stable form, creating that satisfying snap and preventing bloom the white, chalky appearance that develops when you handle chocolate improperly. The specific temperatures aren’t arbitrary they correspond to different cocoa butter crystal structures.
Professional confectioners use specialized tools like marble slabs for chocolate work and copper pans for caramel, but home cooks can achieve excellent results with careful attention to technique and temperature. A digital thermometer becomes your most valuable tool, removing guesswork from these temperature sensitive processes.
Serving & Pairing Suggestions
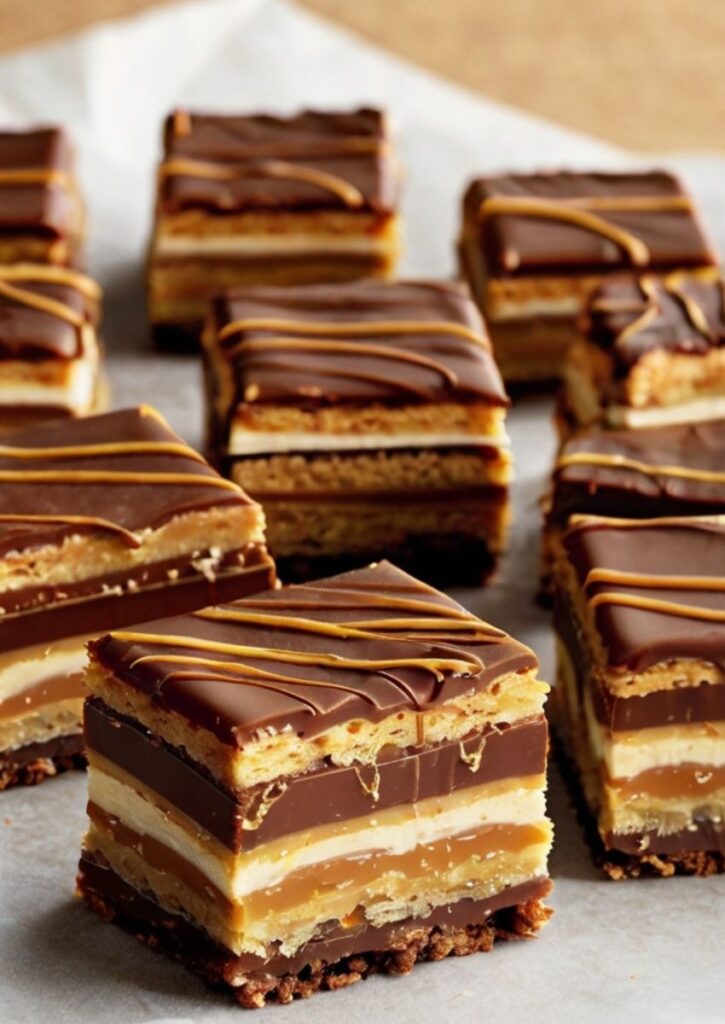
Homemade Twix bars shine when you present them with the same care you took in their creation. Arrange them on a wooden cutting board or marble slab, allowing the chocolate’s glossy finish to catch the light. For special occasions, dust lightly with flaky sea salt or drizzle with contrasting white chocolate.
These bars pair beautifully with espresso or strong coffee the bitterness balances the sweetness while the warmth enhances the chocolate’s flavor complexity. Red wine, particularly port or dessert wines, creates sophisticated flavor combinations that transform a simple candy bar into an elegant dessert course.
For entertaining, consider creating a dessert charcuterie board featuring your homemade Twix alongside other confections, fresh berries, and artisanal chocolates. This presentation elevates the humble candy bar to gourmet status while showcasing your confectionery skills.
Temperature affects both flavor and texture significantly. Serve at room temperature for the best experience cold bars become too firm, while warm bars lose their structural integrity. If you’ve stored them in the refrigerator, allow 15-20 minutes at room temperature before serving.
Troubleshooting Common Issues
Even experienced bakers encounter challenges with this recipe. Grainy caramel usually results from stirring during cooking or inadequate cream temperature always warm your cream before adding it to prevent temperature shock. If your caramel seizes, add a tablespoon of warm cream and whisk vigorously off the heat.
Soggy shortbread stems from applying caramel before the base has cooled completely or using caramel that’s too hot. The base should feel completely cool to the touch before you proceed. If your shortbread becomes soggy, there’s unfortunately no fix prevention proves key.
Chocolate that won’t set properly indicates tempering issues or ambient temperature problems. Humid conditions interfere with chocolate setting, while temperatures above 75°F prevent proper crystallization. If your chocolate remains soft, refrigerate briefly to set, though this may cause bloom.
Uneven layers suggest you rushed the process or didn’t allow adequate cooling between steps. Each component needs time to set properly before you add the next layer. Patience truly is the most important ingredient in confectionery work.
Storage and Shelf Life
You can store properly made Twix bars in airtight containers at room temperature for up to one week. Layer between parchment paper to prevent sticking and avoid temperature fluctuations that can cause chocolate bloom. Refrigeration extends shelf life to two weeks but changes the texture the chocolate becomes harder and the caramel firmer.
For longer storage, individually wrap bars in plastic wrap and freeze for up to three months. Thaw at room temperature for best results, though condensation can affect the chocolate’s appearance. The flavor remains excellent despite cosmetic changes.
Professional confectioners often age their caramel based confections for 24-48 hours before coating in chocolate, allowing flavors to meld and develop complexity. While not necessary, this aging process does enhance the final product’s depth.
Creative Variations
Once you’ve mastered the basic technique, endless variations become possible. Salted caramel versions use flaky sea salt in both the caramel and as a finishing touch, creating sophisticated flavor complexity. Brown butter shortbread adds nutty notes that complement the caramel beautifully.
You can transform the entire bar with flavored caramels bourbon caramel appeals to adult palates, while vanilla bean paste creates elegant simplicity. Coffee infused caramel satisfies mocha lovers, while a touch of cinnamon evokes autumn warmth.
Chocolate variations offer another avenue for creativity. White chocolate creates an entirely different flavor profile, while ruby chocolate adds fruity notes. Milk chocolate appeals to traditionalists, while extra dark varieties satisfy sophisticated palates.
Consider textural additions like toasted nuts, crispy rice, or freeze dried fruits you can incorporate into the caramel layer. Keep these additions small enough not to interfere with clean cutting but substantial enough to provide textural interest.
Professional Tips for Success
Temperature control dominates successful confectionery work. Invest in a quality digital thermometer and calibrate it regularly in boiling water. Room temperature affects every component work in a cool kitchen when possible, especially during chocolate work.
Timing coordination separates professionals from amateurs. Plan your work so each component finishes at the right time there’s nothing worse than perfectly tempered chocolate cooling while you scramble to cut bars. Prepare all tools and ingredients before you begin.
Quality ingredients make dramatic differences in confectionery work. Use the best chocolate, butter, and cream you can afford you can’t mask or improve these flavors through technique alone. Fresh ingredients also matter stale nuts or expired cream will compromise your final product.
Practice makes perfect in confectionery work more than almost any other cooking discipline. Each attempt teaches valuable lessons about timing, temperature, and technique. Don’t let early failures discourage you even professional chocolatiers continue learning throughout their careers.
The satisfaction of creating perfect Homemade Twix Bars extends far beyond the eating experience. It’s about understanding the science behind favorite flavors, developing precise techniques, and creating something that brings joy to others. These skills transfer to countless other confectionery projects, opening doors to a world of creative possibilities.
Whether you’re a professional looking to expand your repertoire or a passionate home cook seeking new challenges, mastering Homemade Twix Bars provides a foundation for advanced confectionery work. The precision you develop improves all aspects of your cooking, while the delicious results provide immediate gratification for your efforts.
Common Questions About Making Twix Bars at Home
Q: Can I make these bars without a thermometer?
A: While possible, using a thermometer dramatically improves your success rate. For caramel, watch for the color change to deep amber and test by dropping a small amount into cold water it should form a soft ball. For chocolate, the tempering process becomes much more difficult without temperature guidance.
Q: Why did my caramel turn grainy and how can I fix it?
A: Grainy caramel results from sugar crystallization, usually caused by stirring during cooking or undissolved sugar crystals. To fix it, add 2-3 tablespoons of water and reheat gently, stirring until smooth. Prevention works better use a clean pan, don’t stir once boiling begins, and ensure all sugar dissolves initially.
Q: How do I know when my chocolate is properly tempered?
A: Properly tempered chocolate sets within 3-5 minutes at room temperature with a glossy finish and clean snap. Test by dipping a knife in the chocolate if it looks dull or takes longer than 10 minutes to set, you need to repeat the tempering process.
Q: Can I make these bars ahead of time for a special event?
A: Absolutely! These bars actually improve after 24-48 hours as flavors meld together. Make them up to one week ahead and store in airtight containers at room temperature. For best appearance, avoid refrigeration until necessary.
Q: What’s the best way to cut clean bars without cracking the chocolate?
A: Use a sharp, heavy knife you’ve warmed in hot water and dried between cuts. Work quickly but deliberately, and avoid sawing motions which can crack the chocolate. Room temperature bars cut more easily than cold ones.

Swiftly Captions by Tina Smith — Quick, flavorful food recipes made simple, bringing fresh inspiration to your kitchen every day


