Picture this: you’re standing in your kitchen at 2 AM, staring into an open fridge, when suddenly lightning strikes. Not the scary kind – the delicious kind. What if those leftover mac and cheese could become something extraordinary? What if comfort food could get even more comforting?
That’s exactly how the Macaroni and Cheese WAFFLE Cheeseburger was born in my kitchen three years ago. I’d been experimenting with waffle makers beyond breakfast (because let’s be honest, those things are criminally underused), and this beautiful accident happened when I pressed cold mac and cheese between those hot plates. The result? Pure magic.
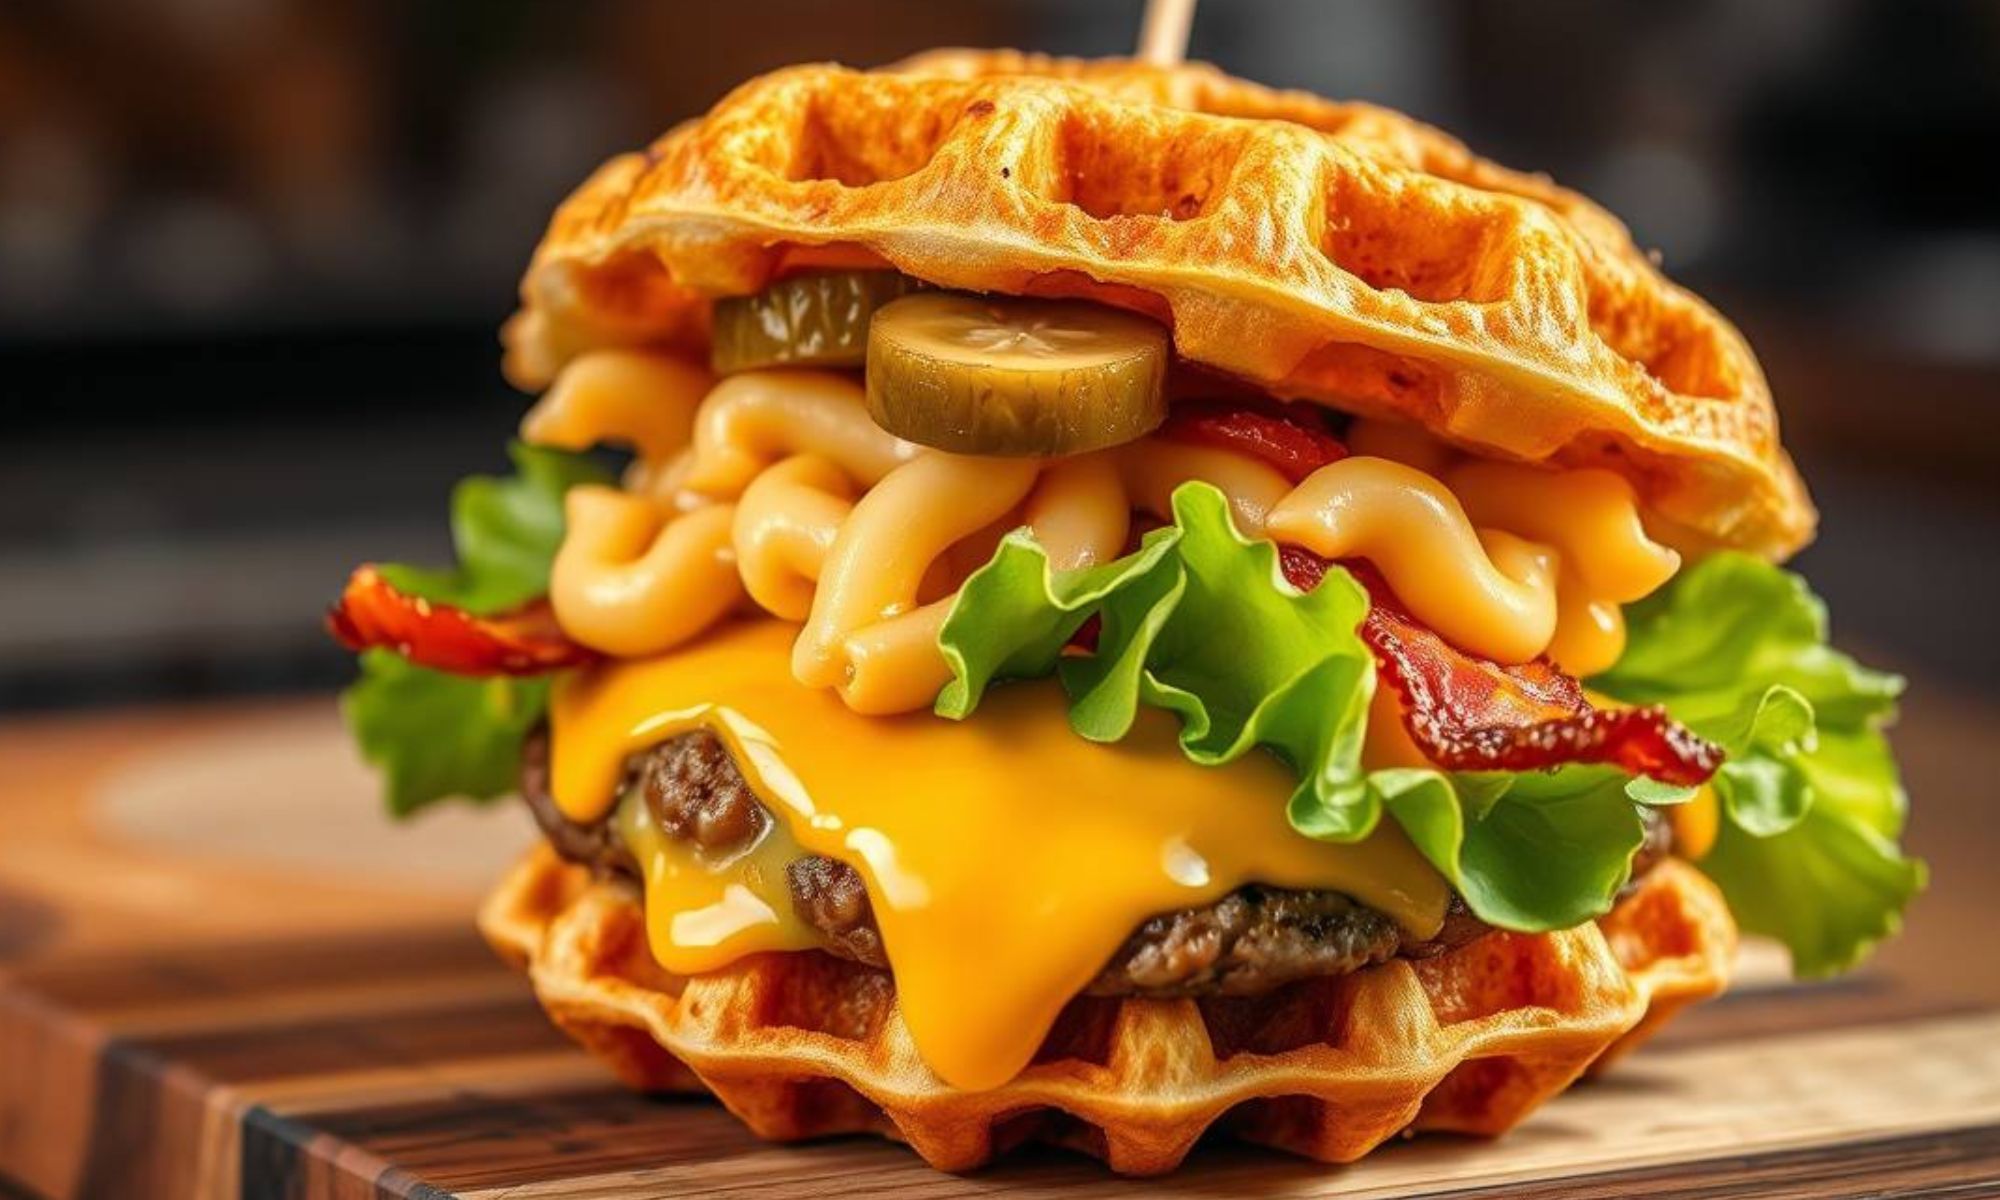
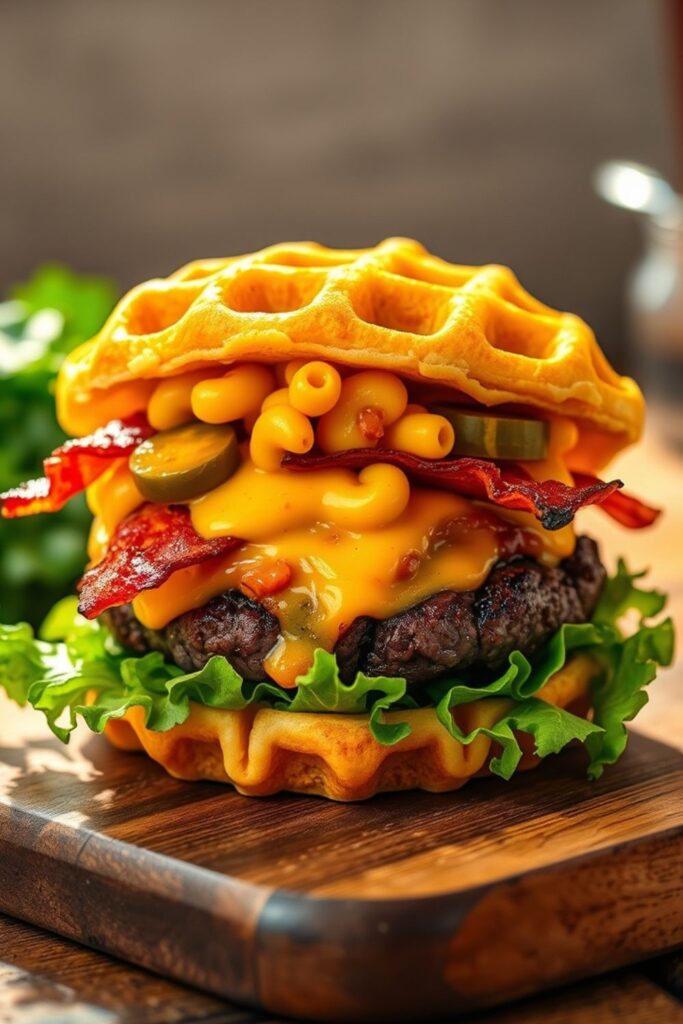
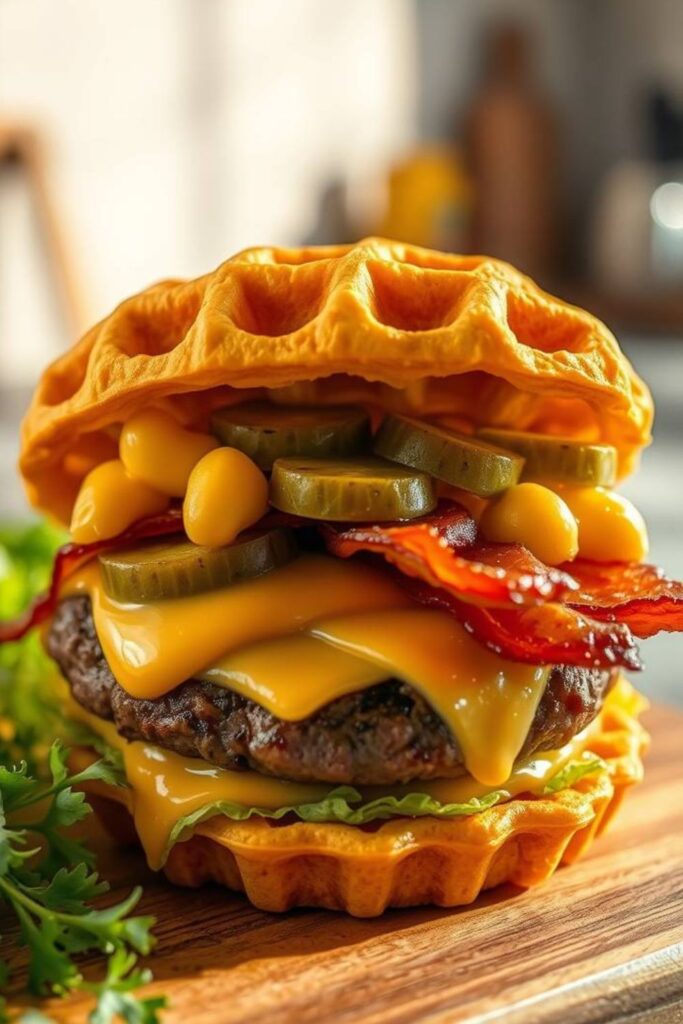
This isn’t your typical burger, folks. We’re talking about transforming creamy, cheesy pasta into crispy, golden waffle “buns” that cradle a juicy beef patty. The Macaroni and Cheese WAFFLE Cheeseburger is the kind of dish that makes people stop mid-bite and whisper, “What sorcery is this?”
The beauty lies in the contrast – you get that satisfying crunch from the waffled exterior while the inside stays creamy and indulgent. Add a perfectly seasoned burger patty, and you’ve got yourself a meal that’ll ruin you for regular cheeseburgers forever.
Why This Macaroni and Cheese WAFFLE Cheeseburger Will Change Your Life
Every cooking enthusiast needs that one showstopper recipe. You know the one – it makes guests text you the next day begging for the recipe. This burger fusion is exactly that dish.
The technique itself is genius in its simplicity. Cold mac and cheese becomes structurally sound when pressed in a waffle iron, creating natural pockets that hold burger toppings like they were designed for it. Which, in a way, they were.
This Macaroni and Cheese WAFFLE Cheeseburger breaks every rule about comfort food. It’s messy, indulgent, and absolutely unapologetic about being over-the-top. Sometimes that’s exactly what we need.
Getting Started – The Foundation
Ingredients for the Mac and Cheese Waffles
For the Mac and Cheese Base:
- 1 pound elbow macaroni (or shells – they hold cheese better)
- 4 tablespoons butter
- 1/4 cup all-purpose flour
- 2 cups whole milk (don’t even think about skim)
- 8 oz sharp cheddar cheese, freshly grated
- 4 oz gruyere cheese, grated (trust me on this one)
- 2 oz cream cheese, softened
- 1 teaspoon Dijon mustard
- 1/2 teaspoon garlic powder
- Salt and white pepper to taste
- 2 large eggs (the secret binding agent)
For the Burger Components:
- 1 1/2 pounds ground beef (80/20 blend is perfect)
- 1 teaspoon kosher salt
- 1/2 teaspoon black pepper
- 1/2 teaspoon garlic powder
- 4 slices thick-cut bacon
- 4 butter lettuce leaves
- 2 large tomatoes, sliced thick
- Red onion, sliced thin
- Pickles (the good dill ones)
- Your favorite burger sauce
Smart Swaps That Actually Work
Running low on gruyere? Swiss works beautifully, or even a sharp white cheddar if you’re feeling adventurous. Just avoid pre-shredded cheese – it’s coated with anti-caking agents that mess with the melting magic.
Can’t do dairy? I’ve had success with cashew-based cheese alternatives, though you’ll want to add an extra egg to help with binding. The texture won’t be identical, but it’ll still be damn good.
For gluten-free folks, use your favorite GF pasta and substitute the flour with cornstarch mixed with a tablespoon of water. The waffle iron doesn’t discriminate – it’ll crisp up beautifully either way, especially when building a Macaroni and Cheese WAFFLE Cheeseburger that holds its structure without sacrificing flavor.
Here’s something most people don’t know: the pasta shape matters more than you think. Elbow macaroni is classic, but shells or cavatappi create better cheese pockets. Those little curves and ridges grab onto the cheese sauce.
Step-by-Step Magic for Your Macaroni and Cheese WAFFLE Cheeseburger
Creating the Perfect Mac and Cheese Base
Start by cooking your pasta just shy of al dente. We’re talking one minute less than the package directions. Why? Because this mac and cheese gets a second round of heat in the waffle iron, and nobody wants mushy pasta.
While the pasta cooks, melt your butter in a heavy-bottomed saucepan over medium heat. Whisk in the flour and cook for about two minutes – you’re making a roux, and it needs to lose that raw flour taste. This is where patience pays off.
Slowly pour in the milk, whisking constantly. I mean constantly. Stop whisking and you’ll get lumps, and lumpy cheese sauce is nobody’s friend. Keep whisking until it thickens enough to coat a spoon.
Now comes the cheese magic. Remove the pan from heat and add the cream cheese first – it helps create that silky base. Then add the cheddar and gruyere in handfuls, stirring until each addition melts completely. The Dijon mustard goes in next, followed by the garlic powder and seasonings.
This ultra-creamy base is what gives the Macaroni and Cheese WAFFLE Cheeseburger its rich, irresistible character – it’s more than just a sauce; it’s the glue that brings the whole masterpiece together.
Here’s where most people mess up: they add the pasta immediately. Don’t. Let the sauce cool for about five minutes, then whisk in those eggs. This prevents them from scrambling when they hit the hot cheese.
Fold in the pasta gently but thoroughly. You want every piece coated in that golden goodness. Taste and adjust the seasoning – this is your moment to make it perfect..
The Overnight Transformation
Transfer the mac and cheese to a buttered 9×13 baking dish and press it down firmly. Cover with plastic wrap and refrigerate overnight. This step is crucial – the mixture needs time to set up so it’ll hold together in the waffle iron.
I know waiting is torture, but trust the process. That overnight rest allows the flavors to meld and the texture to firm up. It’s like pasta magic happening in your fridge.
Waffle Iron Wizardry
Heat your waffle iron to medium-high. Too hot and the outside burns before the inside heats through. Too cool and you won’t get that crispy exterior we’re after.
Cut the chilled mac and cheese into portions that fit your waffle iron. I usually get about 6-8 portions from one batch, depending on the size of your iron.
Lightly spray the waffle iron with cooking spray (even if it’s non-stick – better safe than sorry). Place a portion of mac and cheese in the center and close the lid. Don’t press down hard – let the iron do its work.
Cook for 4-5 minutes, until the exterior is golden brown and crispy. The first one might not be perfect – that’s your tester. Adjust timing as needed.
Building the Ultimate Burger
While the waffles cook, prepare your burger patties. Form them slightly larger than your mac and cheese waffles – they’ll shrink as they cook. Create a small dimple in the center of each patty to prevent that annoying dome shape.
Season generously with salt, pepper, and garlic powder. Cook in a cast iron skillet over medium-high heat, about 3-4 minutes per side for medium doneness. Don’t press down on them – you’re not making a panini, you’re making a burger.
Cook the bacon until crispy, and save some of that rendered fat for extra flavor if you’re feeling indulgent.
The Science Behind Your Macaroni and Cheese WAFFLE Cheeseburger
What makes this technique work so brilliantly? It’s all about the Maillard reaction – that beautiful browning that happens when proteins and sugars hit high heat. The waffle iron creates the perfect environment for this, giving you maximum surface area for browning.
The eggs in the mac and cheese act as a binder, similar to how they work in a frittata. When heated, they set up and help hold everything together while creating structure.
The cheese plays a dual role here. It provides flavor, obviously, but it also contains proteins that help bind everything together when heated. That’s why fresh-grated cheese works better than pre-shredded – it melts more smoothly and creates better binding.
Here’s something fascinating: the waffle iron’s ridged surface creates varying temperatures across the mac and cheese. The peaks get hotter and crispier, while the valleys stay creamy. It’s like getting multiple textures in one bite.
The overnight rest isn’t just about convenience – it’s about structure. As the mac and cheese cools, the starch in the pasta continues to absorb moisture, creating a firmer base that can withstand the waffle iron’s heat and pressure.
Making Your Macaroni and Cheese WAFFLE Cheeseburger Beautiful
Presentation That Wows
Place your mac and cheese waffle on the plate first – it’s the star of the show. The golden, crispy exterior should face up to show off those beautiful waffle ridges.
Top with the burger patty, then layer on the bacon, lettuce, tomato, and pickles. The contrast of colors is stunning – golden waffle, rich brown beef, crisp green lettuce, and bright red tomatoes.
For the top “bun,” place the second waffle at a slight angle so people can see the layers. It’s more visually interesting than a perfectly stacked burger.
Perfect Pairings
This burger is rich and indulgent, so you’ll want sides that provide contrast. A simple arugula salad with lemon vinaigrette cuts through the richness beautifully. Crispy sweet potato fries add color and complement the cheese flavors.
For drinks, think about balance. A crisp IPA works wonderfully – the hop bitterness plays against the cheese’s richness. If you prefer wine, try a Pinot Noir or even a sparkling rosé. The bubbles cleanse the palate between bites.
Want to make it a party? Set up a waffle bar with different toppings. Caramelized onions, sautéed mushrooms, different cheeses, or even a fried egg. Let people customize their creation.
Making This Recipe Your Own

Once you’ve mastered the basic technique, the variations are endless. Try adding jalapeños to the mac and cheese for heat, or swap the beef for a portobello mushroom for vegetarian guests.
Different pasta shapes create different textures. Shells hold more cheese, while rotini creates interesting spiral patterns in the waffle. Even leftover baked ziti works beautifully.
The cheese combinations are limitless. Try smoked gouda for depth, or add some blue cheese for funk. Just remember to keep the ratios similar – you need enough binding cheese to hold everything together.
Feeling adventurous? Add herbs to the mac and cheese. Fresh thyme, rosemary, or even some chopped bacon bits can transform the flavor profile completely.
Troubleshooting Your
If your waffles are falling apart, the mac and cheese might not be cold enough. Give it more time in the fridge, or add an extra egg to the mixture.
Burning on the outside but cold inside? Lower your waffle iron temperature and cook longer. Every machine is different, so adjust accordingly.
Mac and cheese too thick? Add a splash of milk when reheating. Too thin? A handful of extra cheese will fix that right up.
The waffles can be made ahead and reheated in a 350°F oven for 5-7 minutes. They’ll crisp up beautifully and taste just as good as fresh.
Frequently Asked Questions
Can I use leftover mac and cheese for this Macaroni and Cheese WAFFLE Cheeseburger?
Absolutely! In fact, leftover mac and cheese often works better because it’s already had time to set up. Just make sure it’s cold and firm before attempting to waffle it. If it seems too soft, add a beaten egg to help with binding.
How do I store leftover Macaroni and Cheese WAFFLE Cheeseburgers?
Store them in the refrigerator for up to 3 days. To reheat, pop them in a 350°F oven for 5-7 minutes to restore that crispy exterior. The microwave will make them soggy, so avoid it if possible.
Can I make these ahead for a party?
Yes! Make the mac and cheese waffles earlier in the day and keep them warm in a 200°F oven. They’ll stay crispy and ready to assemble into burgers when your guests arrive.
What if I don’t have a waffle iron?
You can use a panini press or even a grill pan, though you won’t get those signature waffle ridges. Press the mac and cheese firmly and cook until golden and crispy on both sides.
Can I freeze the mac and cheese mixture?
The prepared mac and cheese can be frozen for up to 3 months. Thaw it overnight in the refrigerator before cutting and waffling. The texture might be slightly different, but it’ll still be delicious.
The Final Bite
This Macaroni and Cheese WAFFLE Cheeseburger isn’t just a recipe – it’s a conversation starter, a comfort food revolution, and quite possibly the best thing you’ll make all year. It takes two beloved classics and creates something entirely new.
The beauty of this dish lies in its perfect imperfection. It’s messy, indulgent, and absolutely unapologetic about being over-the-top. Sometimes that’s exactly what we need.
Master this technique, and you’ll never look at leftover mac and cheese the same way again. Your waffle iron will become your new best friend, and your guests will be begging for the recipe.
So go ahead, embrace the chaos. Make something that would make your grandmother proud and your cardiologist nervous. Life’s too short for boring food, and this Macaroni and Cheese WAFFLE Cheeseburger is anything but boring.
Remember: confidence is the secret ingredient in every great dish. Cook with passion, serve with pride, and watch as this ridiculous, wonderful creation brings people together around your table./isolated-segment.html

Swiftly Captions by Tina Smith — Quick, flavorful food recipes made simple, bringing fresh inspiration to your kitchen every day


