Picture this: your neighbor’s kitchen window glows warm at 6 PM, and that intoxicating aroma drifts across the fence, rich, creamy, with hints of garam masala dancing through the evening air. Your mouth starts watering before you’ve even identified what they’re cooking. Now imagine creating that exact same magic in your own kitchen, using just one pan, and without babysitting a stovetop for hours.
That’s exactly what happened when I accidentally discovered this One Pan Baked Butter Chicken method during a particularly chaotic Tuesday evening. My stovetop was occupied with three other dishes, I had a dinner party in two hours, and desperation led to pure innovation. Sometimes the best culinary breakthroughs happen when we’re backed into a corner and forced to think differently.
This One Pan Baked Butter Chicken isn’t your typical restaurant style dish that requires constant stirring and multiple pots. We’re talking about a revolutionary approach that lets the oven do the heavy lifting while you focus on setting the table, opening wine, or just breathing for five minutes. The result? Tender chicken swimming in a sauce so rich and complex, your guests will swear you spent all day perfecting it.
Why This Recipe Changes Everything
Traditional butter chicken recipes can intimidate even experienced cooks. There’s the overnight marinating, the separate sauce preparation, the careful temperature control to prevent curdling, the constant stirring. It’s enough to make anyone grab their phone and order takeout instead.
But here’s what I’ve learned after years of perfecting Indian cuisine in my own kitchen: the oven is your secret weapon for consistent results. The gentle, even heat creates a more controlled cooking environment than most home cooks can achieve on the stovetop. Plus, there’s something magical about how flavors meld together when everything bakes as one cohesive dish.
This method delivers restaurant quality One Pan Baked Butter Chicken with home cook convenience. The chicken stays incredibly moist, the sauce develops deep layers of flavor, and cleanup becomes a breeze. It’s the kind of recipe that makes you look like a culinary genius without requiring genius level skills or professional training.
The beauty of this One Pan Baked Butter Chicken lies in its forgiving nature. Miss the timer by five minutes? No problem. Accidentally add a bit too much cream? It’ll still be delicious. This recipe builds confidence while delivering impressive results every single time.
Essential Ingredients for Perfect Results
Here’s what you’re gonna need, listed in the order you’ll actually use them, none of that alphabetical nonsense that makes no sense when you’re cooking:
For the Chicken Marinade:
- 2 lbs boneless chicken thighs, cut bite sized
- 1 cup plain Greek yogurt
- 2 tablespoons fresh lemon juice
- 2 teaspoons garam masala
- 1 teaspoon ground cumin
- 1 teaspoon smoked paprika
- 1 teaspoon kosher salt
- ½ teaspoon black pepper
For the Sauce:
- 3 tablespoons ghee (or butter)
- 1 large yellow onion, finely diced
- 6 garlic cloves, minced
- 2 tablespoons fresh ginger, grated
- 2 tablespoons tomato paste
- 1 can (14 oz) crushed tomatoes
- 1 cup heavy cream
- 1½ teaspoons garam masala
- 1 teaspoon ground coriander
- ½ teaspoon turmeric
- ½ teaspoon cayenne pepper
- 1 teaspoon kosher salt
- ¼ teaspoon brown sugar
- 3 tablespoons fresh cilantro, chopped
- 1 tablespoon fresh lime juice
Smart Ingredient Swaps That Actually Work
Now, let’s talk real world substitutions because life happens, and grocery stores don’t always cooperate with our dinner plans.
Don’t have ghee? Regular butter works perfectly fine, you’ll just miss out on that subtle nutty depth that ghee brings to authentic One Pan Baked Butter Chicken. If you’re feeling adventurous, brown your butter first for extra flavor complexity.
Greek yogurt can be swapped for regular plain yogurt, but the Greek variety gives better texture and more tanginess. Avoid vanilla or flavored yogurts, they’ll make your marinade taste like dessert gone wrong.
Heavy cream making you nervous? Coconut cream is your friend here. It adds a subtle sweetness that actually complements the warm spices beautifully. For the chicken thighs, you could use breasts, but here’s the thing, thighs have more fat, which means more flavor and they’re nearly impossible to overcook.
Can’t find garam masala at your local store? Make your own with equal parts ground cinnamon, cardamom, and cloves, plus a pinch of black pepper and nutmeg. It won’t be exactly the same, but it’ll get you in the right flavor neighborhood for this One Pan Baked Butter Chicken.
Fresh ginger beats dried every single time. If you’re stuck with ground ginger, use about one third the amount. And please, for the love of good food, don’t use garlic powder when fresh garlic is what makes this dish sing.
The Magic Method: Step by Step

Step 1: Marinate Like Your Dinner Depends on It
In a large mixing bowl, whisk together yogurt, lemon juice, and all the chicken spices until smooth. This isn’t just coating, it’s flavor insurance that guarantees tender, well seasoned meat. The acids in the yogurt and lemon juice start breaking down the proteins immediately, making your chicken incredibly tender.
Add your chicken pieces and massage that marinade in like you’re giving it a spa treatment. Get your hands in there and really work it around. Cover tightly and let it sit for at least 30 minutes, but if you’ve got time, let it go for up to 4 hours. The longer it marinates, the more complex those flavors become in your final One Pan Baked Butter Chicken.
Step 2: Build Your Aromatic Foundation
Preheat your oven to 375°F. In your trusty oven safe skillet or Dutch oven, melt the ghee over medium high heat. Add those diced onions and cook until they’re golden and starting to caramelize around the edges, about 8-10 minutes of patience.
Here’s where many home cooks rush things, but don’t be tempted. Those onions are building the foundation of your entire sauce. Rush this step, and you’ll miss out on that sweet, complex flavor that separates mediocre butter chicken from restaurant quality One Pan Baked Butter Chicken.
Add the garlic and ginger, cooking just until fragrant, about 30 seconds max. Any longer and you risk burning them, which would add a bitter note you definitely don’t want in your final dish.
Step 3: Create the Sauce Symphony
Stir in that tomato paste and cook for another minute, stirring constantly. This step concentrates the tomato flavor and removes any raw, metallic taste that can ruin your One Pan Baked Butter Chicken. The paste should darken slightly and smell more concentrated.
Add your crushed tomatoes along with garam masala, coriander, turmeric, cayenne, salt, and brown sugar. Let this mixture simmer for about 5-7 minutes, stirring occasionally. You’ll notice the color deepening and the aroma becoming more complex and inviting. That’s exactly what you want happening.
Slowly pour in the heavy cream, stirring constantly to prevent any curdling disasters. The sauce should transform into a beautiful orange red color that practically screams “delicious.” Taste and adjust seasoning, this is your moment to make it perfect.
Step 4: The One Pan Magic Moment
Remove your marinated chicken from the fridge and nestle those pieces right into the bubbling sauce. Don’t worry about perfect arrangement, just get them mostly submerged. The chicken will release some juices as it cooks, which only makes the sauce better and more flavorful.
Cover your pan with foil or a tight fitting lid and slide it into the preheated oven. Bake for 25 minutes covered, then remove the cover and bake for another 12-15 minutes until the chicken reaches 165°F internally and the sauce has thickened to coat the back of a spoon consistency.
Step 5: The Finishing Touches
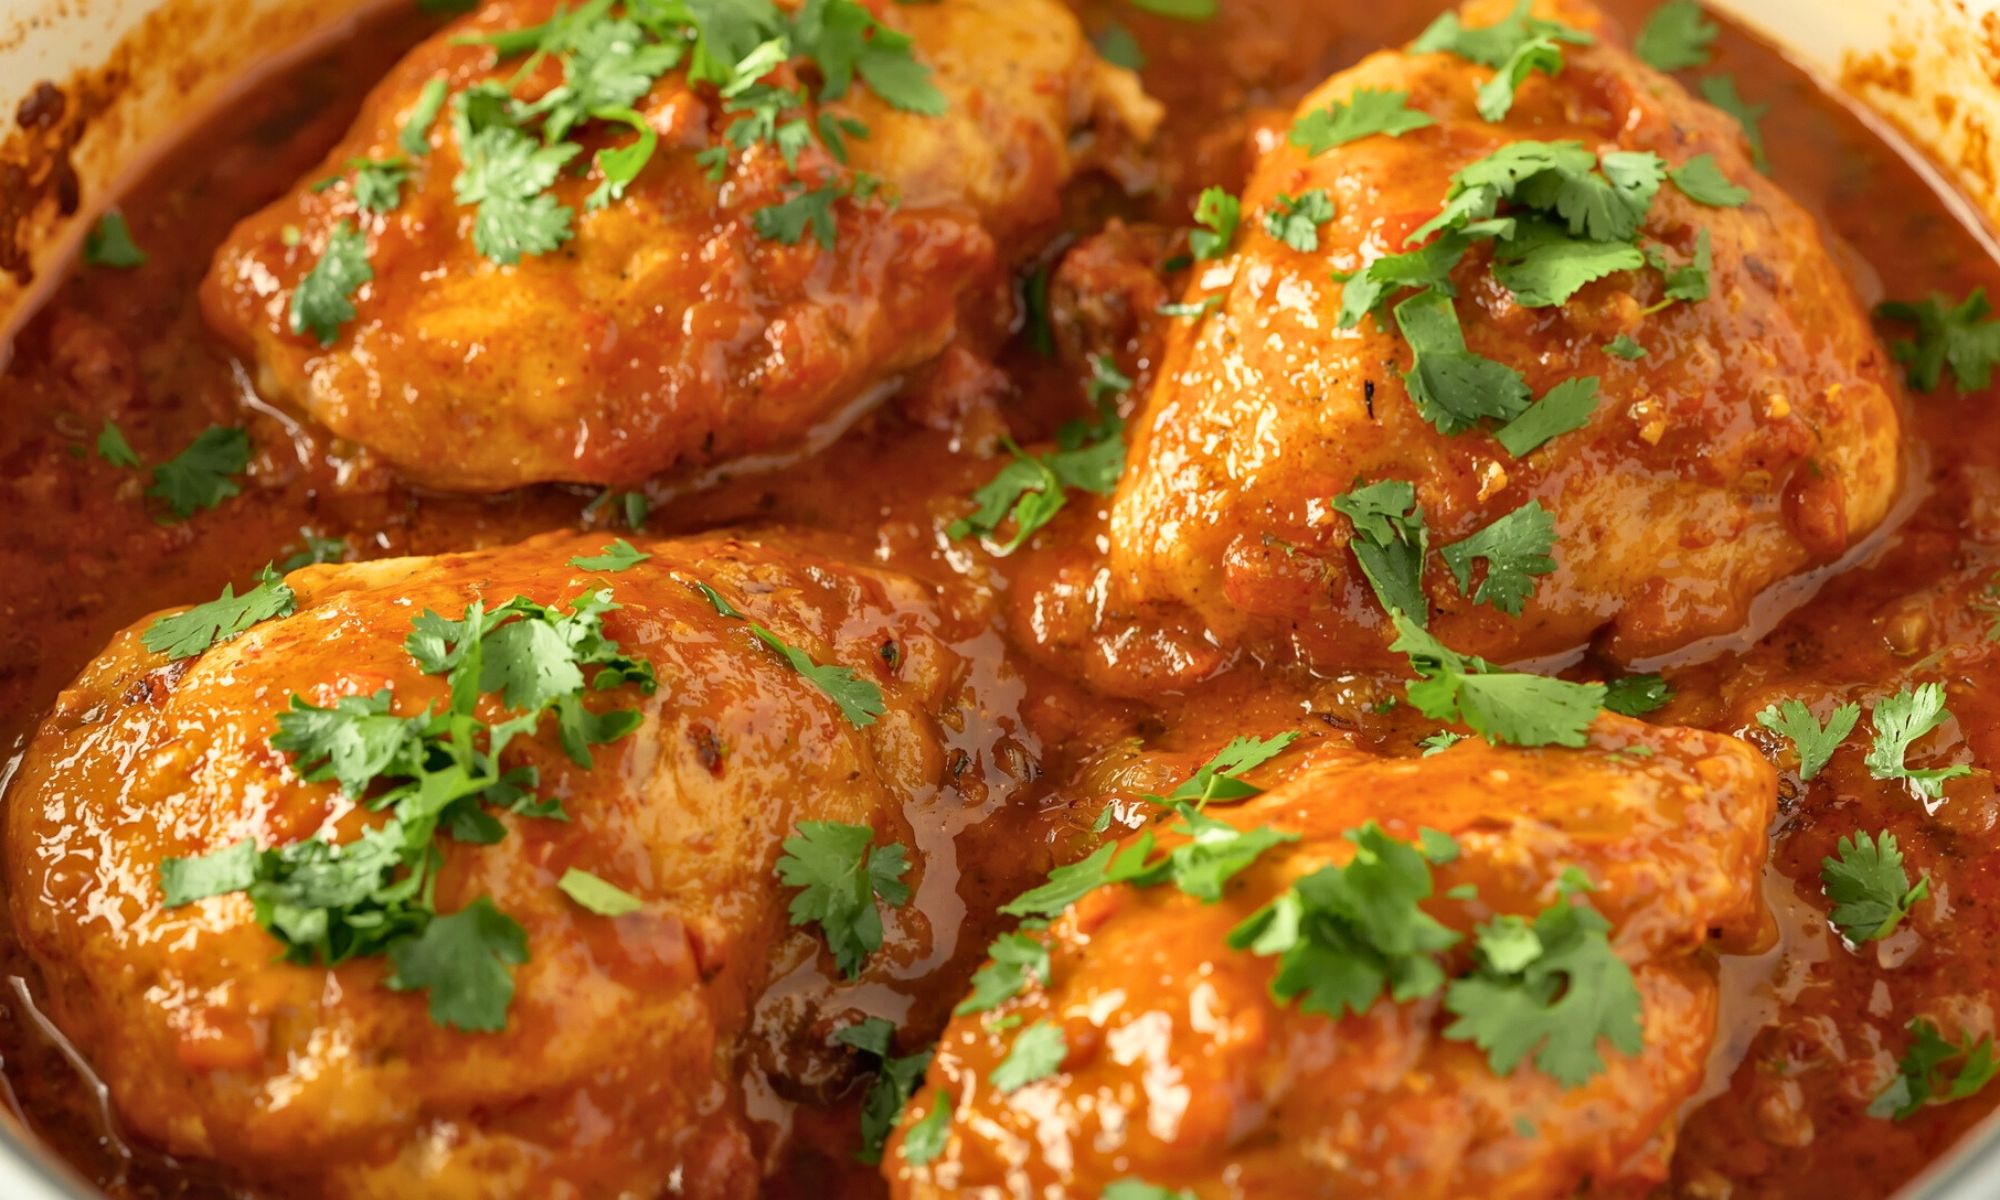
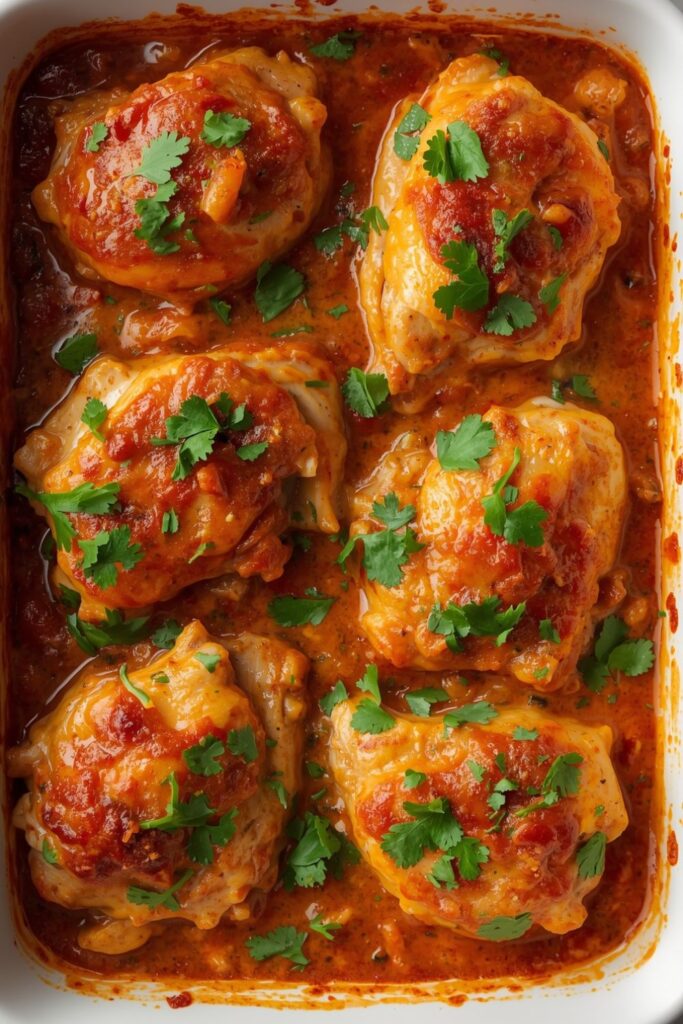
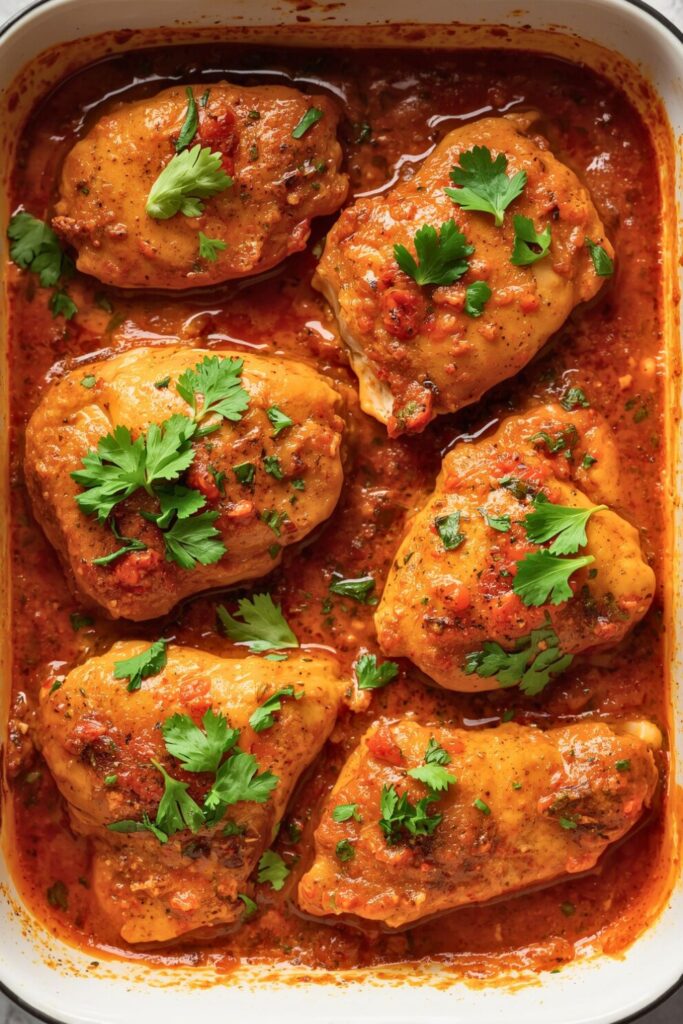
Remove from oven and let your One Pan Baked Butter Chicken rest for 5 minutes. This resting time allows the sauce to thicken slightly and the flavors to marry beautifully. Stir in fresh lime juice and most of the cilantro, reserving some for garnish.
The Science Behind the Dish
There’s actual food science magic happening in that oven that makes this method superior to traditional stovetop versions. The consistent, gentle heat allows the proteins in the chicken to cook evenly without the hot spots that can create tough, overcooked edges.
Meanwhile, the sauce is reducing and concentrating flavors without the risk of scorching that can happen with stovetop cooking. The covered baking creates a mini steam environment that keeps the chicken incredibly moist while the uncovered portion allows for proper thickening.
The yogurt marinade is doing triple duty in this One Pan Baked Butter Chicken. The lactic acid tenderizes the meat, the proteins help create that signature creamy texture, and the cultures add subtle tang that balances the rich sauce. It’s like having a built in tenderizer, thickener, and flavor enhancer all in one ingredient.
That initial searing of the onions creates what food scientists call the Maillard reaction, those browning compounds that add incredible depth and complexity. It’s the same reaction that makes toast taste better than bread or gives grilled meat those irresistible flavors we crave.
The tomato paste gets cooked separately because raw tomato paste tastes harsh and overly acidic. That crucial minute of cooking mellows it out and concentrates the umami compounds that make everything taste more savory and satisfying in your finished One Pan Baked Butter Chicken.
Troubleshooting Common One Pan Baked Butter Chicken Challenges
Sauce Too Thin? Remove the chicken pieces temporarily and simmer the sauce on the stovetop for a few minutes until it thickens. A slurry of cornstarch and water works too, but reduction gives better flavor.
Chicken Overcooked? Next time, check at the 20-minute mark if using chicken breasts. Thighs are more forgiving, but even they have limits.
Sauce Separated? This usually happens when the cream gets too hot too fast. Remove from heat and whisk in a tablespoon of cold cream to bring it back together.
Not Enough Heat? Add cayenne gradually, you can always add more, but you can’t take it back. Start with pinches, not spoonful’s.
Making It Restaurant Beautiful
Once your masterpiece comes out of the oven, presentation matters. Let it rest for about 5 minutes, this gives the sauce time to thicken slightly and the flavors to settle into harmony.
Garnish with fresh cilantro and maybe a dollop of cool yogurt on the side. The green herbs provide a fresh contrast to all that rich creaminess, and they make your One Pan Baked Butter Chicken look professionally prepared. A sprinkle of garam masala on top adds visual interest and an extra hit of aromatic spices.
Serve this over perfectly cooked basmati rice or with warm, pillowy naan bread. The rice soaks up that incredible sauce like a sponge, while naan gives you something substantial to scoop with. If you’re feeling fancy, a side of pickled red onions or cooling cucumber raita cuts through the richness beautifully.
For wine enthusiasts, this One Pan Baked Butter Chicken pairs wonderfully with a medium bodied red like Côtes du Rhône, or if you prefer white wines, try a slightly sweet Riesling to balance the warm spices. Beer lovers should reach for a crisp lager or wheat beer.
Creative Variations to Try
Once you’ve mastered the basic recipe, try these exciting variations:
Coconut Curry Version: Replace heavy cream with full fat coconut milk and add a tablespoon of red curry paste with the tomatoes. This creates a fusion One Pan Baked Butter Chicken with Thai influences.
Vegetarian Adaptation: Swap chicken for cauliflower florets, paneer cubes, or chickpeas. Adjust cooking time accordingly, vegetables need less time than meat.
Smoky Version: Add a teaspoon of smoked paprika and a chipotle pepper in adobo sauce for a southwestern twist on traditional One Pan Baked Butter Chicken.
Extra Veggie Packed: Stir in bell peppers, peas, or spinach during the last 10 minutes of cooking for added nutrition and color.
Meal Prep and Storage Solutions
This One Pan Baked Butter Chicken is a meal prep champion. The flavors actually improve after sitting overnight, making it perfect for busy weeknight dinners. Store in airtight containers in the refrigerator for up to 4 days, or freeze portions for up to 3 months.
When reheating, do it gently on the stovetop over medium low heat, stirring occasionally. Add a splash of cream or chicken broth if the sauce has thickened too much. Avoid microwaving if possible, it can make the sauce separate and the chicken rubbery.
For freezing, let the dish cool completely before portioning into freezer safe containers. Leave some headspace for expansion, and label with the date. Thaw overnight in the refrigerator before reheating.
Bringing It All Together
This One Pan Baked Butter Chicken proves that some of the best culinary innovations come from necessity and a willingness to experiment. What started as a desperate attempt to manage multiple dishes has become my go to method for creating restaurant quality Indian food at home without the stress.
The beauty lies in its elegant simplicity, one pan, minimal cleanup, maximum flavor impact. You get all the complexity and richness of traditional butter chicken without the fuss, constant stirring, or fear of curdling sauces. It’s the kind of recipe that transforms weeknight dinners into something special and turns novice cooks into confident home chefs.
The key to success with this One Pan Baked Butter Chicken is trusting the process and resisting the urge to overthink things. Let the oven work its magic while you set the table, open some wine, or just enjoy those incredible aromas filling your kitchen. Sometimes the best cooking happens when we step back and let time, temperature, and quality ingredients do their thing.
This recipe builds confidence because it’s nearly foolproof, yet delivers results that look and taste like you’ve been perfecting Indian cuisine for years. It’s approachable enough for beginners but sophisticated enough to impress the most discerning dinner guests.
Whether you’re cooking for family dinner, meal prepping for the week, or hosting friends, this One Pan Baked Butter Chicken delivers every single time. Master this recipe, and you’ll have a reliable crowd pleaser that never gets old.
Common Questions
Can I use chicken breasts instead of thighs?
Absolutely, but you’ll need to adjust your timing and technique slightly. Chicken breasts cook faster and can dry out more easily than thighs, so check for doneness around the 18-20 minute mark. The internal temperature should reach 165°F. Thighs are more forgiving because their higher fat content keeps them moist, but breasts work fine if that’s your preference. Consider pounding them to even thickness for more consistent cooking.
How spicy is this One Pan Baked Butter Chicken recipe?
This recipe lands somewhere between mild and medium on the heat scale, perfect for most palates. The cayenne pepper is your heat controller, so start with just a pinch if you’re heat sensitive, or bump it up to a full teaspoon if you like things fiery. Remember, you can always add more heat during cooking, but you can’t take it away once it’s incorporated into the sauce.
Can I prepare this One Pan Baked Butter Chicken ahead of time?
This dish actually tastes even better the next day after all those complex flavors have had time to meld and deepen. You can prepare it completely, then reheat gently on the stovetop or in a low oven. If you’re meal prepping, it keeps beautifully in the fridge for up to 4 days or in the freezer for up to 3 months without losing quality.
What’s the best reheating method for leftovers?
Reheat gently on the stovetop over medium low heat, stirring occasionally to prevent sticking. Add a splash of cream, milk, or chicken broth if the sauce has thickened too much during storage. Avoid the microwave if possible, it can make the sauce separate and turn the chicken rubbery. Low and slow reheating maintains that silky texture and prevents overcooking.
Can I double this recipe for a crowd?
Definitely! Just make sure you’re using a large enough pan, a big Dutch oven or roasting pan works perfectly. Don’t overcrowd the chicken pieces, as this can lead to uneven cooking. You might need to add 5-10 minutes to the cooking time for a larger batch, but the method stays exactly the same. It’s actually a fantastic dinner party dish because it serves a crowd with minimal hands on effort

Swiftly Captions by Tina Smith — Quick, flavorful food recipes made simple, bringing fresh inspiration to your kitchen every day


